
My original blog post to create the FPP Diamond Stocking HERE
And the template for the diamond is HERE
Be sure to share your stockings on Instagram and tag us @sunnydaysupply! Use the hashtag #sunnystockingsal
Happy Stitching!
]]>
My original blog post to create the FPP Diamond Stocking HERE
And the template for the diamond is HERE
Be sure to share your stockings on Instagram and tag us @sunnydaysupply! Use the hashtag #sunnystockingsal
Happy Stitching!
]]> 
Here are a couple stocking ideas you might want to consider! The first stocking is our Nine Patch Stocking, using a simple quilt block and our original stocking template. You can find the instructions for this stocking HERE!

Another stocking I would like to share is the Cross Stitch Stocking. The tutorial for the block used in this stocking can be found on our dear friend Heidi Staples blog. You can find it at Fabricmutt.blogspot.com. I used the Half-Pint stocking template for this stocking. It's a petite stocking! You can find the template HERE.

Have fun with all your Merry Making! Remember to tag us @sunnydaysupply and use the hashtag #sunnystockingsal!!!
**All Sunny Day Supply templates and tutorials are the intellectual property of Sunny Day Supply. Do not copy our tutorials or templates to sell or publish as your own.**
]]>

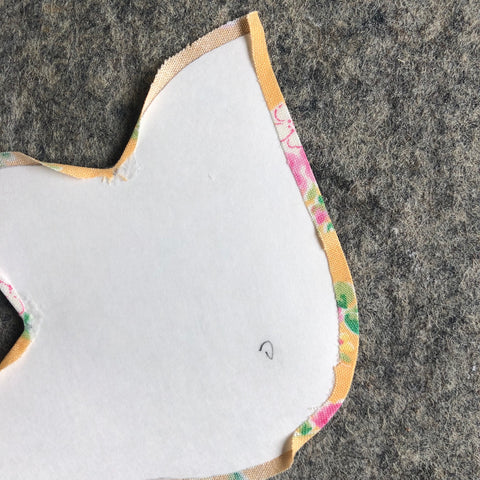
Place the stocking template on top of the panel. Be sure you have the top of the stocking situated on the panel so that no more than a quarter inch of the foundation fabric is visible at the top. This quarter inch will disappear in the seam allowance. Here is a YouTube Video that may help.
Once you have an exterior front, you can cut the exterior back. Be sure to flip the stocking template so that you have a front and a back. Cut a lining front and back using your stocking template.

If you haven't basted batting to the back of the exterior pieces, now is the time to add the batting. I use 505 Temporary Basting Spray to baste. Quilt the exterior back if desired.
Now you should have two exterior pieces and two linings.


If you want to add a permanent stocking hanger, now is the time to baste your hanger to the stocking. I usually place my hanger about .75"- 1" from the top and along the right side of the stocking. **Note my stocking toe is facing left** Baste your hanger in place and make sure that only the raw edge is caught in the seam allowance when you sew the stocking units together. Here is a YouTube video that may help with sewing a hanger. You can also use a ribbon or cording for a hanger!

With right sides together, pin a Lining Front to the Exterior Front, at the top straight edge of the stocking only. Using a quarter inch seam allowance, attach the lining to the stocking front at the top. Repeat for the exterior back and lining. Open up the front exterior/lining unit and press the seam allowance toward the lining. Repeat for the back exterior/lining unit. **Remember you are only sewing the top raw edge at this point**
Finally, with right sides together, place a front stocking unit on top of a back stocking unit. Pin in place all along the unit, making sure you match the seams at the top. Using a quarter inch seam allowance, stitch the entire unit Front/Back and Lining Front/Back together. Leave an opening in the foot of the lining for turning the stocking right side out. **Be sure to look over your stocking carefully to make sure all stocking parts have been caught in the seam allowance.**
Here is a YouTube Video to help with sewing your stocking together.
Gently, pull your stocking through the opening in the foot. Push out all the curvy parts in the toe and heel. Give your stocking a good press and stitch the turn-through hole closed.
Yay!!! Give yourself a pat on the back! You have a lovely Clamshell Stocking! Be sure to post your progress on Instagram! And tag @sunnydaysupply...use the hashtag #SunnyStockingSAL
]]>
It's that time of year again! Every October we kick off the Sunny Stocking Sew Along! We will share our templates, designs and ideas for you to use to create your stocking. All of the templates, instructions and tutorials are the intellectual property of Sunny Day Supply. You may use our templates and tutorials, but please do not copy our templates and tutorials to post as your own. Nor do we allow our templates and tutorials to be sold as a pattern or to any quilting or sewing magazine.
You do not need to use our templates or stocking ideas to participate! There are many stocking patterns available to purchase. Cambridge Stitches UK on Etsy has a lovely pattern you can purchase from her Etsy shop!
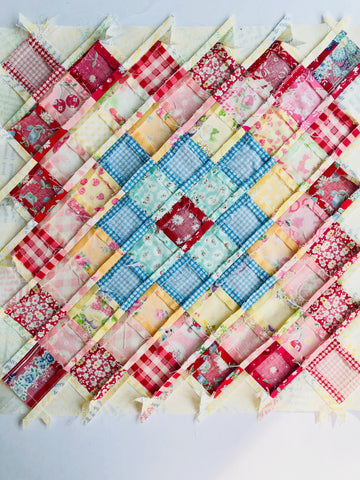
To kick things off, we are going to start with the Clamshell Stocking. The post today will get you started on preparing the foundation fabric, making the clamshells and stitching. In a few days, I will continue with another post showing you how to finish up your stocking!

To begin a clamshell stocking, we need to create a foundation fabric to hold our clamshells. For the large stocking template you will need a fat quarter (at least 18" X 22") of a muslin or solid fabric. I used Kona Snow. The foundation fabric will not be seen in the finished stocking, so it doesn't need to be a nice piece of fabric. On your foundation fabric, you need to use a heat erasable pen (like a frixion pen) to draw a grid. This grid is to help space the clamshells while you sew them into place.
My clamshell is 3.5" so I drew a 3.5" grid from top to bottom and from side to side. The grid should be the same size in height and width as your clamshell. So, if you are using a 2.25" clamshell, then the grid would be 2.25".

Once you have your grid, you may want to trace your stocking outline on the grid. By tracing the outline on the grid you will have a guide as to where the clamshells should be placed. That way you aren't adding a clamshell to a square that will be trimmed away in the end. **excuse my well used template** This is completely optional. You may choose to cover every square with a clamshell. That will give you a bit more wiggle room when you cut out your stocking using the stocking template.


Now that you have your foundation fabric, you are ready to start making clamshells! Transfer your clamshell template to Quilters Template Plastic or cardboard. It's easier to use something that is a bit more rigid for tracing around.
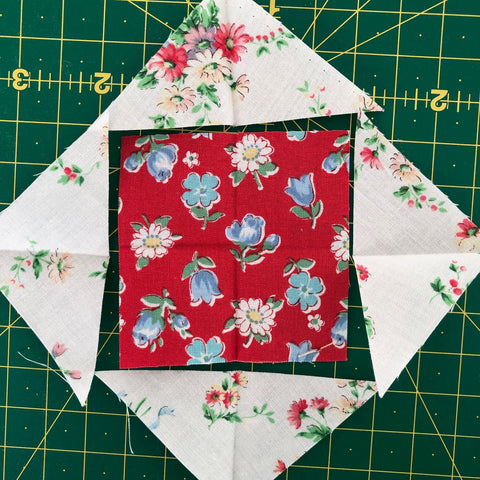
Using a Frixion pen or heat erasable pen, trace your clamshell on the right side of your fabric. Get creative with your fussy-cutting!

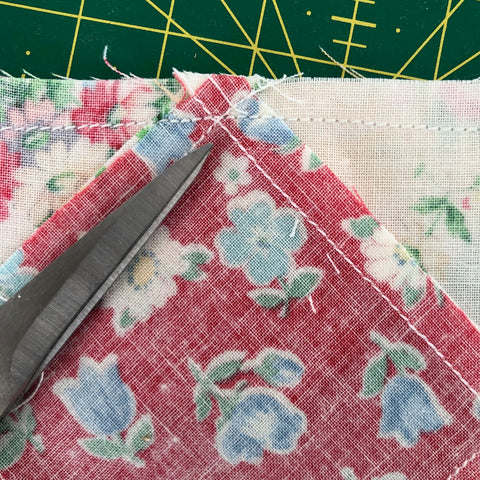
Cut your fussy-cut clamshell leaving a quarter inch seam allowance around the curve and the scooped-out sections of the clamshell. Cut the bottom straight on the line.

You don't need a precise quarter inch, just eyeball it!
Now, it's time to start appliqueing the clamshells to the foundation fabric. I use either a glue pen or Roxanne's Glue Baste-It to hold my clamshells in place. You could also use small applique pens or washable school glue. Just a dab of glue will hold the clamshell in place.
Please note, the top row of clamshells will be trimmed. So to preserve as much of my clamshells as possible, I placed my first clam so it was centered on a grid line. In the photos, you can see where I placed my first clamshell and my finger is pointing to the top of the stocking. Of course, if you cover more of the foundation fabric with clamshells, you will have more wiggle room for cutting out your stocking in the end.


Here is another look at the first row of clamshells and placing the first clamshell centered on a grid line or placing the first clamshell between the grid lines. Just consider where you will be placing the stocking template when your clamshell panel is complete, and you are ready to cut out your stocking. The red line indicates the top of my stocking outline.


Continue adding clamshells and appliqueing them to the foundation fabric. Remember, you only have to applique the top curve. And remember to use the grid lines to keep your clamshells straight. I have a new video on YouTube to help demonstrate adding the clamshells and appliqueing. Just click the hyperlink above or you can go to our YouTube channel by following the link in our Instagram page bio.
You may choose to use the starch method to prepare your clamshells. For my stocking, I am simply using needle turn applique. Remember, take your needle down into the foundation fabric directly below where you pulled the needle through in the clamshell fold. By doing this, you will hide your applique stitches.

Look for our next BLOG post on trimming your stocking and finishing.
TEMPLATES:
Here are the templates you may need for the Stocking SAL! Note, the templates are set to be viewed by anyone. If you have trouble opening, it may be because of your security settings.
This page will take you to all of the Stocking BLOG posts from the past several years! STOCKING POSTS
Be sure to tag @sunnydaysupply when you post your stocking and use the hashtag #sunnystockingsal
We can't wait to see all your Merry Merry Stockings!
]]>
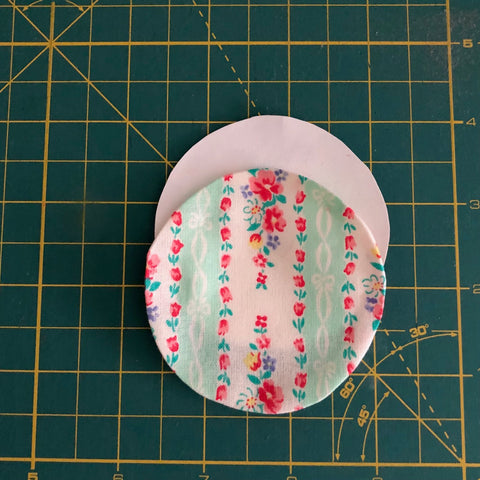
In the pattern and the template set, you have a center circle template. There are several ways to transfer the center circle to your fabric. If you would like to use the starch method to applique the circle, you will need to transfer the finished size of the circle to freezer paper or heavy duty CutRite freezer paper. I found the bottom of my can of starch was the perfect size! I simply traced around the can onto CutRite freezer paper and used that template to make my center circle.

If you prefer to use needle turn applique, you would need to use the template in the set to trace the circle with seam allowance. Mark the line on the right side of your fabric for turning under. Again, I used the bottom of my starch can!

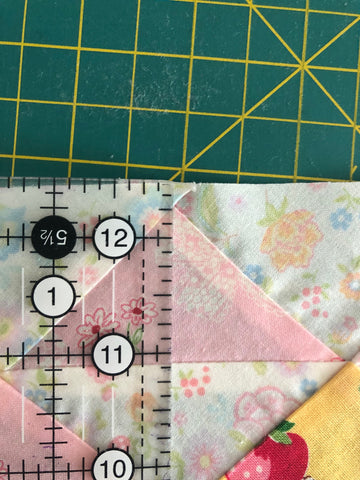
Finally, once you have the center applied, it's time to trim up your block. The finished size of your block is 14.5". My blocks are not all exactly the same size. I will choose a size to trim my blocks, for instance 14" or 13.5" will work. You just need to be certain to leave 1/4" seam allowance around the perimeter.
To trim use an acrylic ruler or a square up ruler. I found a very handy square up ruler! This Creative Grids 14.5" Square It Up Ruler is fabulous! It includes holes drilled in increments to allow you to choose a size that works for your block. Just mark and connect the dots to mark your trim line.


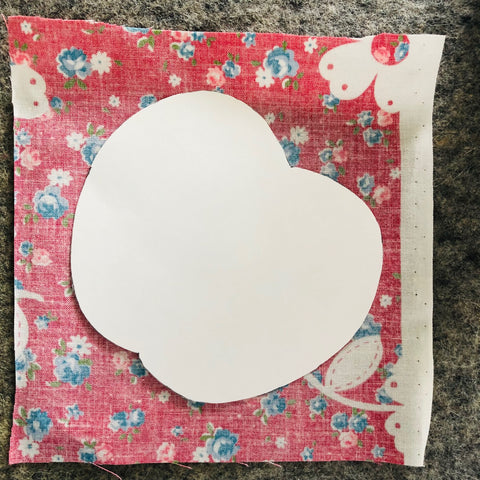
You could also make a finished size template out of freezer paper. Press the finished size to your block and carefully trim. It may be helpful to paper punch a hole in the center of your template paper so you can center the paper on the block.
Continue making and posting your blocks! We can't wait to see your finished Sugar Plum Quilt!
#sugarplumquiltsal
]]>To begin, sew the short seams to of the 4 quarter pieces of the background.

Finger press the center of each quadrant.

Match the seams of the background to the Sugar Plum circle. Then match and pin the finger pressed crease to the circle. Pin in between on the marked sew line.


Stitch, taking care to stay on the sew line, front and back. As we did when sewing the outer circle, when you come to seams do not sew over the seams. Be sure to take small stitches and secure the point before the seam on the sew line. Then pass the needle, diagonally, through from the point at the seam on the front to the point at the seam on the back. Bring your needle and thread back to the front and secure the point on the other side of the seam.

Continue stitching around the circle. Carefully, press the block.
Yay! You are almost finished! Next week we will add the center circle and trim up your Sugar Plum block.
]]>
You will need to cut 12 background pieces and 12 colorful triangles. Begin by piecing a background to a triangle piece.


Once you have the pairs connected into a circle. Clip the inside curved edge to ease the outer ring around the center circle.
Then pin the outer ring around the center swirl circle, taking care to match the seams. You may want to pin the entire circle, but I like to pin a few at a time. That way I am less likely to get poked as I stitch my block.

As you approach the seams that converge, you will need to stitch up to the point in front of the seam. Then take a couple backstitches or a knot to secure the point before the seam.

Pass the needle diagonally through the seam to the point on the backside of your block (the spiral).

Pull the needle and thread all the way through and then bring your needle back to the front of your work. Make sure that you are not catching any other seams when you pass the needle through.


Take a couple backstitches or make a knot close to the seam. It's important to have nice tight stitches on both sides of the seams.

Continue stitching all the way around the circle. Remember you don't need to press your block yet. You can see a short video of this step on our Sunny YouTube channel.
Next week we will add the background square to the circle!


To stitch the segments. add one at a time. A colorful spiral segment to a neutral background segment. First clip the concave segment along the curve. I clip three places, in the middle and between the middle and the end of the shape.

With the concave piece on top facing you, pin the colorful segment to the background segment. Begin at the ends, making sure you are matching and pinning both shapes on the stitching line. Then ease in the fullness and pin between.

Beginning at the center point, stitch along the sew line. Be sure to secure the center with a good knot. Continue to stitch along the sew line and every couple of stitches peek at the backside to be sure you are sewing on the sew line of both pieces. And you may want to take a backstitch every inch or so. This is to secure your stitching. Secure the end with a knot and remember to stitch up to the seam allowance, but do not stitch into the seam allowance.
I have a video of stitching on the sew line here.
This is the way the backside of your center will look as you add segments
 .
.
When you come to the last segment, close the circle by stitching the last and first piece!

You can lightly finger press if you wish, but in hand piecing we won't iron press until the block is completely finished.
Please, be sure to use the hashtag #sugarplumquilt and #sugarplumquiltsal when you post your progress! I can't wait to see your spirals!

]]>
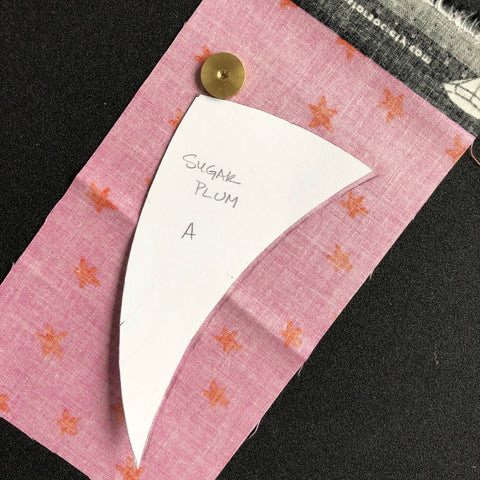
If you have the template set, you will simply trace around or use a rotary cutter to carefully cut around the templates. I placed my template on the wrong side of my fabric with the lettering facing up. Be consistent in how you choose to place the templates on your fabric. The paper pattern shows the grain line for correct template placement.
Once you have traced or cut around the acrylic template, you will need to mark the register holes on your fabric. To mark the 1/4" seam allowance you will need to connect the dots.

Connecting the register dots is a piece of cake on a straight edge. Use the straight edge of the template or an acrylic ruler to mark a 1/4" seam allowance.
In the Sugar Plum block, there are lots of curves! Marking the quarter inch seam allowance on a curve is just a bit trickier. The easiest way to do this is to use the piece that "fits" to the curve to mark your quarter inch seam. Let's take the center spiral as an example. For the convex side of the spiral segment, you use the concave side of the spiral template to mark that curve.

And then for the concave portion of the spiral segment, you will use the convex portion of the template.

Finally, for the top of the spiral, you will use the piece from the outer ring that "fits" to the spiral center.

You can easily mark the curves this way. For the large curve on the background template, move the "B" piece along the curve to mark.


I have a YouTube video that may help with marking and cutting.
And if you would like a set of the templates, you can purchase them from Paper Pieces.
To make your own templates, you will need Quilter's Template Plastic or Cardboard. I would suggest copying the paper template sheet at 100% on your home printer so you aren't cutting or marking your pattern.
If you are using Quilter's Template Plastic, place the plastic on top of the template sheet. Trace the shapes on the solid line. This is your sew line. Carefully cut out the shapes. If you are using cardboard, you can cut the printed copy of the templates on the solid line and glue the shapes to cardboard or card stock. Carefully, cut out the shapes.
Use your template to trace the shape on the wrong side of your fabric. The traced line is the sew line. You will need to add or "eyeball" a quarter inch seam allowance. If you have a quarter inch wheel, run the wheel along the edge of the template with a pencil to add the quarter inch seam allowance.
Another way to add the quarter inch seam allowance is to use an acrylic ruler to mark dots or dashes a quarter inch away from the sew line. Then connect the marks. This will be the line you use to cut out your shape.

You can also eyeball the quarter inch seam allowance when cutting out the shape. The stitching is done on the sew line.
I have a YouTube post to help with making your own templates with plastic. And a YouTube post to help with making your templates from cardboard.
There are so many great tutorials on YouTube from other quilters! I would suggest looking at videos from Wendy Welsh and Kristin Esser. Lastly, Carolyn Forster's book, Hand Pieced Quilts is a fabulous resource.
I hope this helps with the cutting! Of course, for the center spiral, you will need 6 colorful segments and 6 neutral or lightly patterned segments. And for the outer ring, you will cut 12 colorful pieces and 12 neutral. Refer to the pattern or template set for the template piece that coordinates with the block.
Finally, I want to share with you some block examples provided by Judy Newman! Aren't they wonderful!


]]>

I have had fun hand piecing these blocks. And I have learned so much about hand piecing. There are many accomplished hand piecing quilters that I have been studying by reading books, watching YouTube videos, and Instagram videos. Hand piecing is the purest form of quilting and I'm so glad I allowed myself the opportunity to grow in this direction. I hope you find the same joy.
Schedule:
February 10 - Week 1 - Gathering supplies.
February 17 - Week 2 - Cutting
February 24 - Week 3 - Spiral Center
March 2 - Week 4 - Outer Ring
March 9 - Week 5 - Background
March 16 - Week 6 - Center circle & trimming
___________________________________________
Today we will talk about the tools that will help with hand piecing.

Thread: It is most often recommended is to use 100% cotton thread and 50 weight is a good weight. However, I probably break every thread rule! I love to use the Fujix poly thread that we carry in the shop. Fujix is a good strong thread and does not tangle. And....hold onto your pincushion, my next statement is shocking! I use white or off-white thread and rarely "match" my thread to my fabric. If I am piecing with a dark background, I will use a dark thread. Of course, for applique it is always recommended to match your thread to the applique.

Needles: Choose a needle you feel comfortable to use in hand sewing. I often use a milliner needle in size 10. Recently, after reading Carolyn Forster's book, I tried using a sharps needle in size 10. I like it! I feel that perhaps I have a bit more control since the needle is slightly shorter. It's good to experiment!

Thimble: You may want to use a thimble, however, I prefer to hand sew without a thimble.

Pins: Applique pins or shorter pins are a must! You will pin the fabrics on the stitching line as you sew.

Scissors: Good sharp scissors for accurate cutting.

Marking tool: I have used several different marking tools and my favorite has been the Sewline Pencil Trio. This pencil has a lead black, pink, or white option for marking. I have not tried to remove the markings, but the instructions state they can be removed with water or an eraser. If you mark just dark enough to see, it should be light enough not to be visible on the front of your project. Be careful if you use a marking tool that is removed with heat. Test removing the marks on your fabric. I used a very popular sewing marker on a beloved project, only to find it left ghost marks when I tried to remove the marks with the iron. So always test first!

Sandpaper Board: This is so helpful! A board covered with fine sandpaper to hold your fabric as you trace your pattern. I purchased a Jen Kingwell brand from Amazon, but you can easily make your own.

Sugar Plum Pattern and Template Set: We have a few Sugar Plum Quilt patterns (Judy Newman) in the shop. The template set can be purchased from Paper Pieces.
Miscellaneous: If you are making your own templates, you will need cardstock or cardboard. Another option for making your own template is to use Quilter's Template Plastic.
You might want a seam roller to press seams.
Okay! Gather your supplies and start pulling your fabrics, the Sugar Plum Quilt Sew Along is underway!
]]>

HO HO HO!!! Sunny Day Supply teamed up with Poppie Cotton and Elea Lutz for a holly jolly Christmas project. My pattern for Christmas Candy Cone Garland first appeared in a Mollie Makes Christmas edition. So if you are up for another fast and fun Christmas project this year, why not try some Candy Cones! String them as a garland, use them as ornaments, or add them to a package as a festive gift topper!
Here is the template for the CANDY CONE
And here is the BLOG post link for the instructions!
Have fun and be sure to tag @sunnydaysupply and @poppiecotton when you make your Christmas Candy Cones!

]]>
You can choose to make one or both. I will post links to templates and tutorials in this blog post. You can also search past Norah and Stocking blog posts by typing Norah in the search bar for the Norah posts, and Stocking in the search bar for the Stocking posts.

All of our tutorials and templates are free for you to use. However, our tutorials and templates are not free to copy, duplicate or replicate to be distributed as your own. They are not to be sold to a magazine, or a publication. Nor to be duplicated in a pattern as your design. If you use our Sunny Stocking tutorial and design, or our Norah Quilt tutorial and design, please credit Sunny Day Supply. Sadly, our free tutorials have been sold by quilters to magazines for personal gain.
NORAH QUILT -

The Norah Quilt was originally made for my friend's new baby, Norah. A couple years later, a few friends mentioned making a Norah Quilt with me and so the Norah Quilt Sew Along was born!
It's a very simple idea. Take a traditional log cabin block and make it a quilt! To make it even more interesting change the center and make each of the 4 sides of the quilt a single color or shades of a single color. So grab your 4 colors and let's get started.
We will begin with the center. In a traditional log cabin block, the center square represents the fire in the home and all of the logs wrap around the center. The Norah Quilt has an offset center. I began with a 2" square, and rather than wrapping the next strips around the center, I added strips to only two sides. Refer to the diagram for the beginning square and the subsequent logs or strips.

You may choose to make your strips or logs larger. Simply adjust the measurements to make the center unit the size you want. I cut my strips 2" wide.
Once the center unit is complete, I begin at the top and add a neutral color strip to the top of the center unit. Then working in a counterclockwise direction, add neutral color strips to frame the center unit.

Now you are ready to start adding the 4 colors chosen for the sides. Begin at the top of your center unit again, and add the first color. Move in a counterclockwise direction and add another strip color for each side. The color blocking gives the Norah Quilt a fun effect! Play with the placement of the colors!
Keep adding strips until your Norah is the size you desire. I usually end mine at about 60-ish inches square. It's the perfect size for a throw quilt.
TIPS!!!
I have a few tips for the Norah Quilt, and I have learned a few tips from the amazing quilters who have made a Norah over the years.
The first tip is how to keep your Norah flat. Many trips around the center of the Norah can result in warping. I have had a couple that were fairly puffy in the center, but I was still able to baste them flat before quilting.
Each strip of each side of the Norah is like adding a border. When adding a border to a quilt, a measurement is taken at both ends and one in the middle. You take an average of those measurements and cut your strip to that measurement. I saw a brilliant and easier way to manage this from Michele Eickerman. Simply lay your strip across the center of the quilt and smooth flat. Cut the strip even with the center. Pin the strip at the ends of the quilt and the center, then stitch! Michele Eickerman is an amazing quilter! You can follow her at @meickerman on Instagram.

Another tip comes from my friend, Jenni Jones. Jenni leaves a strip tail at the beginning and the end of a side and carefully trims the strip even with the sides of the quilt. You can find Jenni's account @sewlavenderstitches on Instagram!

Squaring up the sides each time you add a strip helps keep everything straight. You can easily square up sides by using a wide acrylic ruler and making sure you have the two perpendicular sides along a straight edge before trimming.

I would suggest that every once in a while, use a tape measure and measure the ends and the middle of your Norah. Hopefully, all three measurements are about the same!
Another tip to keep your Norah square and flat is to press each strip as you add. And press carefully, use a dry iron and press rather than iron back and forth. Pressing rather than ironing back and forth will keep the strips from stretching.
Pin your strips. Pin at the ends and in the middle. Ease in any fullness.
You may want to use wider strips. Wider strips will grow your Norah faster! Or you may want to begin with 2" strips and gradually increase the width of your strips as your quilt gets larger.
Add in fun fussy-cut pieces in the strip! I love to add text to my Norah, even if it is a single word fussy-cut and pieced into a strip. My favorite is the word "SEWING", or "PATTERN". If you are making a Christmas quilt, using Christmas texts would be sweet!
As your quilt gets larger you will need to piece together strips to get the needed length. Try to piece these strips in different ways. In other words, don't always add a piece to the end of the strip. Add in the middle or at the beginning, too. You may even want to piece early in the building of your Norah so the pieced strips look random throughout the quilt.
Don't feel like you have to give your quilt an ombre effect on each side. I find it very interesting to scatter shades of the color throughout a side. If you would like your quilt to have an organic feel, it's not necessary to begin with a light shade and add increasingly darker shades as the quilt grows.

QUILTING-
I love to quilt my Norah Quilt by hand. And I adore using Valdani Perle Cotton in black or a dark color. I feel like the black makes the whole thing pop!
Of course, I prefer to use Fons and Porter Utility Needles to quilt. I also use a hoop. You can find tips for quilting on my Hand Quilting blog post. And here.
Please be sure to share your Norah Quilt and use the hashtag #norahquiltsal
Have fun making your Norah Quilt!
SUNNY STOCKING!!!
We have had the Sunny Stocking Sew Along for so many years now! It's always my favorite! In fact, when I taught at a local quilt shop, this was my favorite class...who doesn't love a Christmas stocking!
Here are the links to all my templates and designs. I have made certain the links are available to everyone to open. If you have trouble opening a link, it may be your security settings. Just send me a DM on Instagram if you are having trouble.
WIDE STOCKING #1 , WIDE STOCKING #2 , WIDE STOCKING #3 , WIDE STOCKING #4
DIAMOND IN A SQUARE FPP TEMPLATE
And here are the tutorials that will help you make each of the stockings!
Original Diamond Stocking and Tips for the Diamond Stocking
Half Pint Stocking - the smallest stocking
Fabric Mutt's Cross Stitch Block Stocking
Finally, this page will take you to all the stocking blog posts!
I hope this helps you get started! Please send me a DM on Instagram if you have any questions. And be sure to use the hashtag #sunnystockingsal when you make your stocking!
Cheers!
]]>
Meet Up #1 - October 16, 2023 - sashing
Meet Up #2 - November 20, 2023 - borders
Meet Up #3 - December 11, 2023 - quilting
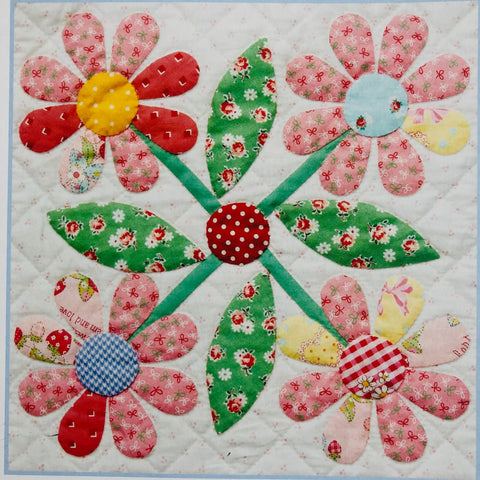
The blocks for this week are the patchwork block, Sugar Plum, and the applique block, Pears.


Sugar Plum -

This is such a sweet block, but I'm not gonna lie....it's challenging.
I used the CutRite Heavy Duty Freezer Paper to make my templates. The CutRite works well if you are using the template over and over.
Once all the templates are cut, it's time to stitch the center swirly part of the block. I found it's more important to make sure the outer part of this part meets nicely to create a circle. The center is going to be covered by template A. Press all your seams in one direction, following the diagram in the book. Take care not to stretch as there are lots of bias edges in this block.
Now it's time to create the outer ring. Again, make sure the outside edge creates a nice smooth curve. Press the seams toward the colorful triangle. And, again, take care not to stretch with all the bias edges.

I DID NOT applique these two circles together (the swirly center circle and the outer triangle circle). Rather, I carefully pinned the swirly center to the outer circle. Make sure you are meeting the seams properly. I found it helpful to use my quarter inch foot and run a basting stitch around the swirly center. Then I could match the outer circle to the center and preserve my points. After the block was complete, I just removed any basting stitches that might be showing.

Finally, instead of stitching the entire circle to a pieced background, I cut a 13" square from my background fabric. I folded the background square in half both ways and pressed a crease. I arranged the large circle in the center of the background square. Then I used applique to stitch the large circle to the background. Again, I ran a basting stitch a quarter inch from the edge on the large circle. This gave me a turn line to applique the center to the background.
I flipped the block over and carefully cut away the extra fabric from the center circle to reduce bulk. Give the block a good press and trim to 12.5" square.
Pears -

Well, this block is just delightful! I wasn't as eager to start this block, but once I finished, I absolutely loved it! It's an easy shape and by now everyone is a master at leaves. The embroidery stitches make every part of this block just pop!
Enjoy your blocks this week. I can't wait to see them! We will be drawing names for more fun treats in about a week. Be sure to use the hashtag #thevintageflowersamplerquiltsal
Thank you to everyone who participated and everyone who cheered us on! This was a super duper fun sew along!
]]>This week we leave the Y-seams behind and say hello to the curves! Perhaps that's out of the frying pan and into the fire!
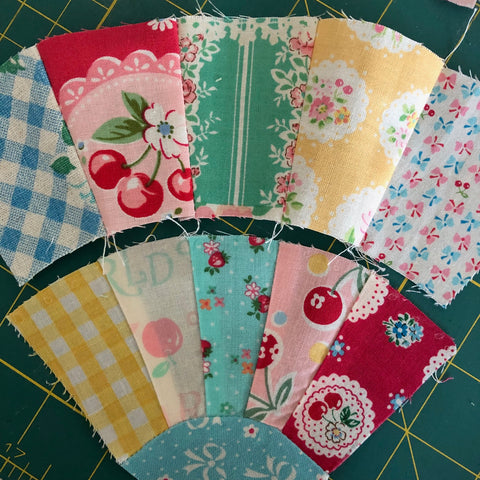
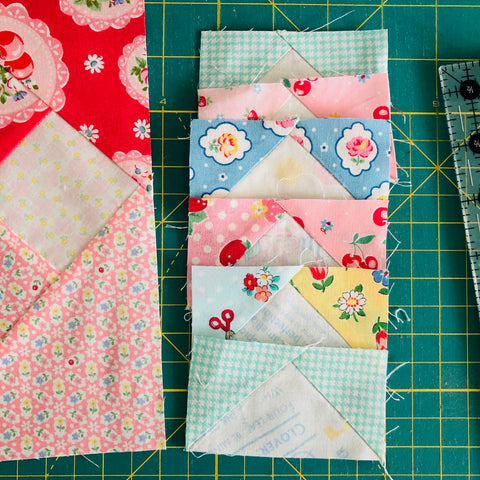
Our patchwork block is Lattice Fan and our applique block is Strawberries.


Lattice Fan -

Lots of curves in this block! And to make it even more exciting we have double curves with seams that need to match. First of all, I made my templates this week with CutRite Heavy Duty Freezer Paper. Since I am repeating shapes multipe times, I felt the CutRite Freezer Paper would hold up a bit better.
Once you have your shapes all cut, make sure you are stitching together using a scant quarter inch seam allowance. On my machine that is a 3.7 needle setting. You can check your seam allowance to make sure it is a scant quarter inch. If you haven't done that before simply cut two squares - you may want to cut two 2.5" square. Stitch together with right sides facing and press. Your squares sewn together should measure 4.5". If they are larger or smaller adjust your needle setting or your seam guide until you have two pieces measuring 4.5". You might want to mark your seam allowance on your machine with masking tape or washi tape.
In the Lattice Fan block the first curve to sew is the tiny A template to the B arc. Finger press both pieces so that you can match the middle. Then once you have the middle matched, match the ends. You might want to glue baste this very small quarter circle to the B arc.

Once you have the A piece and B arc basted by pins or by glue, it's time to stitch. With curved pieces you always want to stitch with the concave piece facing you. In other words, the piece that looks like a smile or a 'C'.
Stitch slowly, making sure you keep the raw edges together. Press the seam allowance toward the A piece.
Now it's time to add the second arc or the C pieces. It's very important to match the seams from the B arc to the C arc. Pin at each seam. And pin at the center and the ends.
Again, sew with the concave piece facing you. Press the seam toward the C arc.
If you find any seams are not quite matching, just remove a few stitches on both sides of the seam and adjust. Re-sew the seam at that spot.
Add the large background piece D to each of the fan units. This is done in the same way. Find the center of the larger outer background piece and the center of the pieced fan unit. Pin at the center and the ends. You may pin in between those 3 spots if you wish. Sew again, with the concave piece facing you. Press the seam toward the fan unit.
Sew all 4 fan + background units together following the diagram in the book. Give it a good press and trim to 12.5" if necessary.
Strawberries -

The Strawberries Block is a delightful and fun applique. For all of you who have followed Atsuko Matsuyama over the years, you know the strawberry motif is central to most of her designs.
I used the CutRite Heavy Duty Freezer Paper for my templates. I printed my templates using my home printer. Then I used the starch method to create my applique pieces.
Once the applque is complete, add embroidery stitches using Moco thread or your favorite floss.
Give your Strawberries block a press and trim to 12.5".
]]>


Tallahassee -

I used Reynolds Freezer Paper to make my templates. Press the Freezer Paper to the fabric and cut each piece with scissors or a rotary. I also used a scant quarter inch.
The Tallahassee block consists of 4 smaller pieced squares. The book instructions have open quarter inch seams where the Y-seam is created. They are indicated by the small dot in the diagrams.
I deviated from the instructions by not leaving the quarter inch open in the 4 pieced squares (steps 1-3). I tried both ways, with the open seam and without. I was successful sewing it both ways. If you try this block without the open seams in steps 1-3, let me know what you think.
However, I did leave 1/4" seam allowance unstitched when joining the 4 small squares to the center template A. This is step 4 and step 5 in the instructions.
Begin stitching 4 units that look like bow ties. And 8 of the B and C units. With these units, I did not leave a quarter inch open for an inset seam.


When preparing to stitch these units together, I placed a dot on the seam where all of the seams meet the center square.

I stitched the center first, sewing from dot to dot and not going beyond that dot or seam.
Then I matched the end of the A/B unit with the C/B unit and stitched to the dot or seam and not beyond. All of this is the same as the book instructions except that I didn't leave the seam open for an inset seam.
Once you have all of these finished, add the small D triangles.
Stitch the 4 smaller pieced squares together according to the instructions in the book. Be sure to leave the quarter inch seams open where indicated to create the Y-seams in the center of the block.
Give your block a good press and trim to 12.5" if needed.
Cherries -

This was such a fun and simple block! Luckily, the fruit blocks have gotten easier while the patchwork blocks are more challenging.
Use the method you have become most comfortable with to make the cherries and the center. I used the CutRite Heavy Duty Freezer Paper and the starch method.

Once you have all the cherries and leaves stitched to the background, add embroidery stitches to create the stems.
Have fun with the blocks and be sure to post them using the hashtag
#thevintageflowersamplerquiltsal
]]>


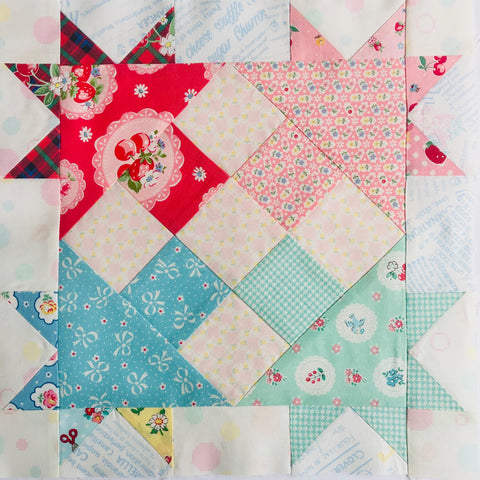
Farmer's Daughter -

For the Farmer's Daughter, I traced and cut templates from Reynolds Freezer Paper and pressed them to my fabric before cutting.

Once all my pieces were cut, I arranged them on my mat. I also made sure my machine needle was set to allow for a consistent scant 1/4 inch.

Sew all the B/C templates together, making sure you mark and leave a quarter inch open where the "arrow" unit meets the A square.
The Y-seam makes another appearance this week. Where the "arrows" meet the A square and where the background is inserted, you will find Y- seams. The secret is to mark the 1/4" where all those seams converge and never stitch beyond that 1/4" mark. Rather stitch right to the 1/4" mark and backstitch.

I found it easier to add the background piece to the top and bottom units first. I added the background to the center A square, and then created the Y-seam with the "arrow" unit on both sides of the center A square. Don't forget to mark the area where the A square meets the "arrows". This open seam is indicated by the small circle on the diagram in the book.

Give your Farmer's Daughter a good press following the pressing directions in the book. Then give yourself a pat on the back! You tackled a whole bunch of Y-seams in that block!
Apples -

I completed the Apples Block long before the Sew Along. At that time, I had not explored the starch method of applique. I used needle-turn applique for this block. But I did use the starch method for my Apple Patchwork Pouch.
These are pretty easy fruits to create and stitch using your favorite applique method. I can't wait to see all the Apples on Instagram this week!
As always, be sure to post your blocks and your progress on Instagram with the hashtag #thevintageflowersamplerquiltsal
I want to close this week's Blog Post on a personal note. Shawn and I love our sweet little shop and being generous in any way possible, including with our FREE tutorials, like the Norah Quilt. Unfortunately, our generosity was abused. But everyone knows a Norah quilt when they see it! We have over 1000 posts on the #norahquilt and #norahquiltsal hashtag! Thank you EVERYONE!!! The Norah Sew Along has been an annual event since 2019. With the help of my friend, Jenni, I created and published the unique center diagram for our blog post tutorial. Anyone who has been following us for the last 5 years knows the center combined with the color blocking shouts, Norah Quilt!
This week was difficult. There are so many emotions and personal connections with the Norah Quilt. It was made for my good friend's baby daughter, Norah. And my friend is more than just a friend. Her husband helped Shawn and I immensely. When our mother was ill, he gave me the words to say to emergency department workers to get the help we needed. When nobody else would listen, he took the time to listen and help. Our mother was diagnosed with a glioblastoma, Norah's mom and dad were there every step of the way. It was an overwhelming time.
So, to have our generosity abused was a gut punch. It's always a good and magnanimous thing to give credit for inspiration or for a pattern you are following. It doesn't diminish your work, just the opposite. It enhances your integrity as a quilter.
We will continue to offer inspiration and free tutorials, because our goal is to always keep it on the Sunny Side.
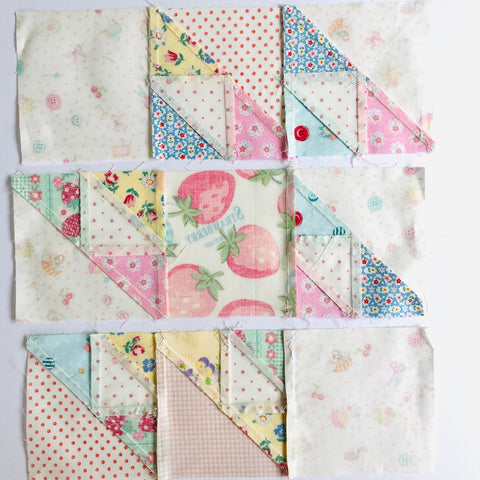
This week we have the patchwork block, Lost Children... and the applique block,Oranges.


Lost Children -

This is the first time in this quilt that we have dealt with the dreaded Y-seams! But luckily this Y-seam is wide and gentle. So let's get started!
I used the template to create my small triangle shapes. And placed all the shapes out in front of me before deciding on a pleasing arrangement. Before sewing my shapes together, I did starch them to control the stretch of the bias. I used a scant quarter inch to stitch all four of the small triangle units.
Create the center piece by stitching two small triangle units to the center square. **NOTE- Because we will be adding a triangle unit to the center piece, we need to leave a quarter inch free at the beginning and end of this center piece. Using your acrylic ruler, mark a quarter inch from each of the 4 corners on the center square ** In the book instructions, you will notice small dots on all four corners of the center square. This is the point where the seam will start and stop. DO NOT SEW BEYOND THE DOTS. Press the seams in the center unit toward the center square.

Stitch two large triangles to both sides of a small triangle unit. **NOTE - Mark the wrong side of the wide end of small triangle unit with a dot. This dot will be one quarter inch from the top of the wide end of this unit. You will leave the the first quarter inch of this unit free. The seam allowance will begin at the dots (as represented in the book).** DO NOT SEW BEYOND THE DOT!

I always place the more "difficult" piece facing me as I stitched this block. In this case, it would be the small triangle units. That way I can be sure my points are preserved by hitting the spot where the seams meet to create the point. Also remember to back stitch a few stitches when you reach the dot.
Before stitching, I lighty starched each of my large triangle units.
I made a series of short videos to illustrate the Y-seam in this block. You can find the videos on Instagram.
I found it easier to stitch the center square to the center of the "wing" unit first. The wing unit is the small triangle with two large triangles. Be sure to start and end at the dot. In other words, the beginning quarter inch and ending quarter inch should be free of stitching (when added to the center unit).
Then I matched the engineered corners of the large triangle to the center unit. With the small triangle unit facing me, I stitched a scant quarter inch seam allowance. Making certain I never stitched beyond the dot.
All of the seam allowances will converge at the dots. That is what makes it a Y-seam. Please, be sure to check the videos on Instagram if you have any questions about sewing this block. I am hopeful the videos will help!
Oranges -
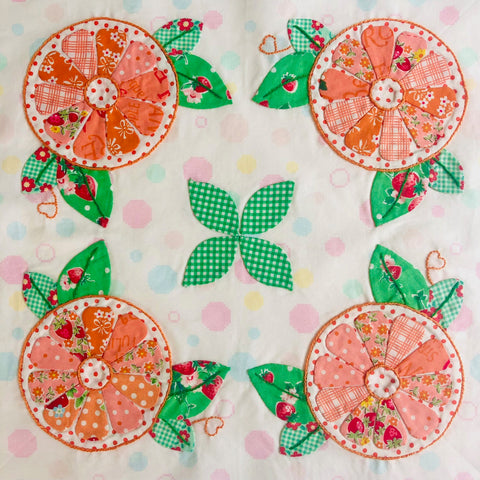
For the oranges blocks I used the starch method of applique, but use any method with which you feel most comfortable.
I used my home printer to print the templates on to the CutRite Heavy Duty Freezer paper. And after preparing all the individual pieces, I created each orange as a single applique.

Using basting glue and my lightbox, each segment was secured to the orange circle. Applique each segment to the circle with a matching thread.
I arranged the leaves and appliqued each leaf in place on the background.

Once everything is arranged and appliqued to the background, you will add embroidery stitches (stem stitch) to outline the center and outer orange circles. I used a back stitch to create the heart next to the orange leaf.
This block takes some time with all the parts, but it's so worth all the effort! We can't wait for all the oranges to pop up on the hashtag #thevintageflowersamplerquiltsal !!! Thank you for sewing along with us!
]]>

Parisienne -

The Parisienne block consists of (4) X patches, a center block and setting triangles. Create your templates for the block using your favorite method. I traced mine onto Reynolds Freezer Paper and pressed my templates to my fabric. When pressing the setting triangles to fabric, place the long edge along the straight of grain. This will eliminate any wavy edges along the outside edge of your block.

I found it was best to use a scant quarter inch when piecing blocks with many seams. A scant quarter inch is just a thread shy of 1/4". In blocks with many seams, the fold pressed back actually takes up some space in your block. Multiplied by many seams and the finished block may be smaller than expected. The scant 1/4" is to accommodate for that. For me, the easiest way to stitch using a scant 1/4" is to move my needle to the right one notch. If you are not able to move your needle, you can use a magnetic seam guide or a piece of tape to mark the scant 1/4". It is just inside the true 1/4" line.
Once your X squares are finished, its time to add the center square and the setting triangles. Lay your pieces in front of you as they appear in the finished block. Press seams in each row in opposite directions so you can easily nest the seams. Take care to match the seams and pin in place.

The final piece to add are the 4 triangles to make the block square. Again, I finger pressed a crease in the triangles and matched to the center of the X square.

Finally, trim your block to 12.5" if necessary. And the Parisienne block is finished!
Grapes -

I had so much fun making this block! This is the first one that has embroidery stitches added to embellish the block.
To make this block, I began by making oodles of circles for the grapes. I used Kay Buckley Perfect Circles and foil to prepare my circles. You can read about that method here.
I prepared my "grape bunch" and then appliqued it to my background. After printing the pattern tempate on my home printer, I transferred the design to my background. Then I used the paper printed template to arrange my grapes in a bunch. Using Glue-Baste-It, I basted the grapes that were overlapping with a small amount of glue.

I found it easier to make this grape applique by starting at the bottom of the bunch. I added the first three at the bottom, glue basting where they overlap.

Then I added the next three and lastly the top four grapes.

Once the bunch was glue basted, I carefully stitched them together where they overlapped.

Finally, I added the stem and leaf to the background square and then my finished grape bunch! The last addition is the embellishment!

I hope you have fun with this block! Be sure to post your progress with the hashtag #thevintageflowersamplerquiltsal
We will have another set of blocks next Monday and then the following week will have a break week to catch up!
]]>


Around the World -

Around the World is a familiar traditional block. You may know it as, Trip Around the World. There are lots of seams in this block, so it is imperative to use and accurate and consistent 1/4 inch seam allowance.
We will begin this block by preparing template A. I used Quilters Template Plastic to make my A template. You may choose to measure and cut your A pieces with a rotary and an acrylic ruler. Be very sure to measure and cut accurately.
As you sew the squares into rows, press the seams in the rows open. I also chose to starch each row to help keep them crisp and straight. Line up your rows in front of you in the proper order.

Once all your rows are finished, add the B triangles to all the rows except the middle or longest row. Take care to add the triangles properly. The long bias edge will face left on all the rows left of the middle row. And they will face the right on all the rows to the right. Refer to the diagram in the book for proper placement. Again, press all seams open.
Now it's time to sew the rows together. I work from the center and add rows to each side. Pin where the seams meet before sewing. Using a 1/4 inch seam allowance, sew right up to the pin and carefully remove before sewing over the pin.

If your seams don't meet up quite properly, take out a few stitches an inch before and after the seam. Reposition the seam and pin again. Gently ease in any fullness without shifting the seam. Press all seams open.
The back of your block will look a bit wild with the extra bits from the triangles added to the top and the bottom of each row. Carefully,trim the extra triangle ends even with your seams.
Using a square up ruler or your acrylic ruler and mat, trim the block to 12.5". Be sure that you have 1/4 inch seam allowance beyond the points on each side.
Rose-

The Rose block is the last of the flower blocks! The stems and leaves are similar to the other flower blocks from prior weeks. The most challenging parts of the Rose block are the scalloped flower and the very small circles!
I printed my templates at 100% with my home printer and CutRite Heavy Duty Freezer Paper. Once I cut the large rose template, I made 4 large rose shapes. Of course, I am using the starch method on this quilt. I found it easier to clip in the "v" or dips in the rose shape and starching/pressing those sections first. Then once the dips are in place, I painted the curves with starch and pressed those into place.


You may want to add a dab of Fray Check in the area where you clipped before you applique. And when you applique this area to the background, take a few very small stitches in the "v" area using a thread that matches the shape.

Once your large rose shapes are complete, you can use this same template to make the 4 smaller scallop rose shapes to layer on the larger one.
The smallest circles are a little more challenging. I found it easiest to cut the small circle from the template printed on CutRite Heavy Duty Freezer Paper. You could also use a circle punch that is similar in size. Because this circle is so small, I found I had better results if I left a small seam allowance to paint and press to the wrong side of the template. Pop out the freezer paper template once your shapes are pressed and cool. Never leave the template in the shape as you applique. These tiny circles are a challenge, but take your time and, I believe, you will be successful!
Keep up the good work!
Don't forget to add the hashtag #thevintageflowersamplerquiltsal - we have more fun giveaways planned! See you next week!
]]>
This week we are working on the Pineapple Block and the Tulips Block!


Pineapple Block

Our patchwork block this week is the Pineapple Block. The Pineapple Block is a variation of a Log Cabin Block. During colonial times the pineapple was the symbol of hospitality. The Pineapple Block can be dated back to the mid-1880's. Instead of 2 light and 2 dark strips as in the log cabin or courthouse steps blocks, the pineapple block consists of 4 light and 4 dark strips wrapped around a center. Since the strips are added on the diagonal it gives this block the spiky appearance similar to a pineapple.
This week is the first week we are directed to cut pieces using the patchwork templates in the book. Take special note of the light and dark fabrics you are cutting from the templates. C, E, G, I and J are the darks. And B, D, F and H are cut from the light fabrics.

Last week, on Instagram, we talked about transferring the templates from the book to a useable form for your sewing. There are many ways to make templates! You might simply copy them using your printer, or you may want to make more substantial templates using cardboard, quilters template plastic or the CutRite Heavy Duty freezer paper. I usually copy templates by tracing the shape onto the paper side of regular Reynolds Freezer paper. Using a light box and a fine permanent marker, I carefully trace my pattern. However, you may want to cut your freezer paper to letter paper size and feed it through your printer. If you use regular freezer paper or CutRite Heavy Duty Freezer Paper, its easy to cut the fabric shape out using your acrylic ruler and a rotary cutter. Please, look back at our Instagram post from July 13th. for more ideas!
The Pineapple Block begins by cutting a center square and triangles to add to each side, very much like an economy block. As you work through this block, finger press a crease in the center of all the triangles or strips to match the center with the center of the strip below it.
And always add strips or triangles to opposite sides of the center. Press seam allowances away from the center.

**NOTE- If you are using the templates from the book to piece your block, once you reach strip D, your strips will no longer overlap when added around the center.

Remember that when piecing with triangles, take care not to stretch your fabric as you feed it through the machine. And I like to sew with the piece I am adding underneath, as I feed it through. This may seem counterintuitive, but I want to be sure that I am preserving my points. I want my needle to hit that intersection of seams to preserve my point.
Continue to add strips, alternating light and dark as represented in the book. Press all seams away from the center square.

When finished, trim up your block to 12.5" square.
Tulips Block

Well, the Tulips block is one of my favorites. I absolutely love the oval segments! They are reminiscent of a Pennsylvania Dutch motif.
I think it's important to reiterate how crucial it is to trace and cut your templates neatly so that you have a smooth tidy template. Beginning with a good template is half the battle! One way to start with a perfect template is to feed your CutRite Heavy Duty Freezer Paper through your printer. Be sure to print at 100%. If you are tracing by hand try to use long smooth strokes in tracing. Take your time.

Another area to focus on is how you cut out the template. First use small sharp scissors. Choose the appropriate size scissors for the job at hand. And then, again, cut in long smooth cuts rather than sawing your way through the template. Lastly, if you have an area with a "dip", cut from one side of the "dip".

And then come back from the other side to complete the cut.

This gives you a much cleaner cut than if you try to clip in that dip and then pivot.
In this block, the stems and leaves are similar to past blocks. The base of the tulip has two semi-circular sections peeking out from behind the center of the tulip. I traced this shape on my CutRite Heavy Duty Freezer Paper as it appears on the template. I pressed this shape to the wrong side of my fabric and cut out leaving a scant 1/4" seam allowance. When painting the seam allowances with starch, I left the bottom section unturned and raw. The bottom section will be covered by the body of the tulip, so it does not need to be finished. Be sure that you are leaving a small seam allowance to wrap around the shape. If your seam allowance is small and neatly cut, it's easier to get a smooth wrap without any folds. If you do get a fold, simply pull that area away from the template, add a touch of starch and press again. Go slow and paint and press a small section at a time. Once you have finished a shape, give it another press with your iron and when it has cooled, pop out the CutRite Heavy Duty Freezer Paper or your layered regular freezer paper. Do not leave the paper in the applique.

As you prepare the body of the tulip, you will need to clip in the "V" sections where the petals flare. Clip into the seam allowance, close to the line for turning under. When you applique sharp corners, take several small stitches in these areas to secure and keep it from fraying. You may want to add a small dab of fray check in any point or sharp corner. I like to paint this area with my starch first and press it in place. Then I go back to a long smooth area of the shape and start painting and folding.


The small oval sections that are layered on top of the tulip are a bit fussy, but Oh So Cute when layered on top of the body of the tulip!
Take your time and gently turn the curve with your needle or fold over if you are using the starch method. Again, I would recommend leaving a very small seam allowance around the small curves on both ends of the ovals. I found it easier to paint and press the curved ends first and then went back to the long straight edges.


Once you have all your pieces prepped, begin with the pieces that are on the bottom (underneath other pieces) and baste using your favorite method. I like to use Roxanne's Glue Baste-It or even white Elmers school glue. When I began quilting, years before glue basting, we used small applique pins. Applique pins work because they are small enough to hold without causing injury. But I found the glue baste-it or even thread basting holds the shape in place better and my hands aren't pricked with the pins.
Of course, match your applique thread to your applique shape! Take your time and enjoy the process!
Be sure to post your process photos to Instagram and use the hashtag
#thevintageflowersamplerquiltsal
]]>

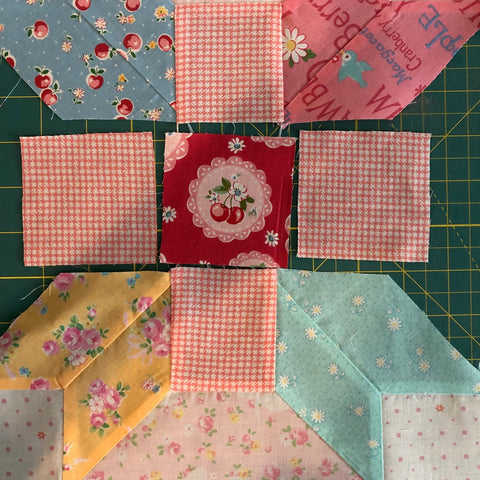
CROSS PLAINS
The center of the Cross Plains block is a simple 9 patch. Alternate a background fabric with 4 different color squares.

Using a quarter inch seam allowance, sew three rows and press seams as indicated in the book. Sew row 1 to row 2 and add row 3. Be sure to match seams and pin at the seams and at the end of each row. Press.

Next, we will add the large triangles to the 9 patch unit. Always add triangles on opposite sides. Press a crease in the center of the large triangle and press a crease in the center square of the 9 patch (matching colors). Line up the creases in the 9 patch and the triangle and pin in place.


Press seams in the direction indicated in the book.
Using the Sew and Flip method, create 8 flying geese units.
It's important to remember that as you add the flying geese borders to the center unit, stitch through the point where the flying geese intersect. This will preserve your points in the flying geese border.

Press your block and trim if necessary. You have finished the Cross Plains block! It's such a striking block!

MARGUERITE

The Marguerite block is very similar to the previous applique blocks with flowers, stems and leaves.
If you are using the CutRite Heavy Duty Freezer Paper and starch method to prepare your applique, you may want to try printing off the templates directly onto the CutRite freezer paper. For the best results in the starch method, you need to start with a smooth accurate shape. Printing the templates onto CutRite with your home printer will give you the most accurate template shape. Be sure your printer is set to copy at 100%.

When cutting out the CutRite shapes, be sure your cutting is smooth. Any bumps or curves in the template will be reflected in your fabric shape. You may use an emery board to lightly file out any imperfections.

So many of Atsuko Matsuyama prints are a patchwork or stripe design. These designs allow for a variety of choices to fussy-cut. And for the applique these are just perfect! We will have a complete restock of Atsuko Matsuyama's Strawberry Party and Rose Ribbon prints in the shop this week.


We can't wait to see your blocks this week! And remember, next week you have an opportunity to catch-up or work ahead! Happy Sewing!
#thevintageflowersamplerquiltsal
]]>
This week we have Rolling Stones as a pieced block and Daisy is the applique block.


Rolling Stones
This block features several squares fussy-cut from a focus fabric. Atsuko Matsuyama used Fruit Label for these squares. When fussy-cutting these "stones" I used a 4.5" square up ruler. It's important to remember to cut it on the diagonal for proper orientation. The square up ruler helps since it's transparent. You could also make your own square template from Quilters Template Plastic. Or, use freezer paper and placing the fabric plus freezer paper on a light box to see the motif for proper cutting.

The smaller squares are going to be added to the 4 corners of the large fussy-cut square using the Sew and Flip method. You can find this technique described in the book. Add the smaller squares on opposite corners of the larger square and be sure to press between adding corner squares. Trim the seam allowance, flip and press!


Like in the previous block, you are going to make three rows of squares.
Press the seams in the three rows in opposite direction. Sew row one to row two, being sure to butt seams and pin. Then sew row three to row two.
Give it a good press and trim to 12.5 inches if necessary.
Daisy

The Daisy block is such a delightful applique. All the techniques for the Daisy block are the same as the previous applique blocks. Remember straight stems and gentle curves on the petals.
It's good to keep in mind, when choosing fabrics that you want to keep balance among the blocks. And just as important, add an unexpected fabric to create a good scrappy look. It harkens back to the days when every scrap was stitched into a quilt. Nothing went to waste.

When your applique is finished, trim up to 12.5 inches square. A Square-Up ruler like the Creative Grids Ruler is very handy for this!

We can't wait to see your blocks this week! It truly warms our Sunny hearts to have you sewing along with us. Don't forget to add #thevintageflowersamplerquiltsal to all your posts!
]]>

Today we will be working on the pieced, Cat's Cradle block and the applique, Sunflowers block.

Cat's Cradle
Let's begin with the Cat's Cradle block! Again, this week we are working with triangles. It's important to try to be as accurate as possible in cutting. And to be consistent in your seam allowance. To help with your seam allowance, there are many tools available to ensure your seam allowance is accurate. If you don't have a quarter inch foot, try adding a strip of masking tape or washi tape so the edge meets the quarter inch mark on your stitch plate. Then simply stitch making sure your raw edge meets the tape marked line.
Also, several quilters have mentioned that they prefer to starch their fabric prior to cutting. If you are finding that your cutting is not quite accurate, you may want to try starching first. The starch helps to keep your fabric from stretching.
Once you have your triangles and squares cut, it's time to start stitching. First, make the 6 HST (half square triangles). The 6 HST's will consist of a colorful fabric plus a low volume background fabric. It always helps me to lay out everything in correct order on my mat in front of me. That way I am less likely to stitch incorrectly and need the seam ripper.

Take 2 more colorful triangles, with right sides facing, line up the straight (90 degree) edges and stitch using a quarter inch seam allowance. Remember that the dog ear, of the colorful triangle, will extend beyond the HST unit. Your needle will fall in the "V" created at that intersection.

Add a large triangle (C) to the long straight edge of your pieced unit. As in the previous blog post, I finger press a crease in the center from the point to the center of the long edge. Match the center of the large triangle to the center of the pieced unit. Stitch and press seam allowances following the diagram in the book.

Now it's time to sew your squares into rows! Arrange your squares on your mat and refer to the diagram in the book for correct orientation. Be careful! It's easy to get those squares flipped around!

You should have three rows. Press seam allowances in opposite directions in the three rows. This will allow you to butt up your seam allowances, so all your squares meet perfectly. Pin at the seams and the ends of the row. Stitch.

Press your Cat's Cradle block and give yourself a pat on the back for conquering the triangles!
Sunflowers

Okay, we are ready to tackle another applique block! The large leaf in this block might be a bit tricky, but this is one of my favorites from the book! I hope you like it too! In my previous blog post, I described the starch method that I am using for the applique blocks in the book. No matter your favorite technique for applique, the blocks in this quilt are fairly quick stitching!
A common shape in this quilt is the circle. On our Sunny Day Instragram account we have had a couple of discussions regarding circle applique techniques. There are many ways to make perfect circles! Needle-turn, Kay Buckley's Perfect Circles, the starch method using freezer paper or CutRite Heavy Duty Freezer Paper, or Allipops! My suggestion would be to take a look at our Instagram posts, June 18th. and June13th. for the informative discussion. Also, a quick YouTube search will yield many excellent videos! Here is a brief overview of a fun way to use the Perfect Circle templates without having to use a running stitch. You will need spray starch. A small piece of cheap foil, not the heavy duty foil. Your Perfect Circle templates and an iron. Choose the size circle you need and, using your Frixion pen, trace around the circle on the wrong side of your fabric.

Spritz your fabric with a shot of starch. Then place your fabric circle plus the template in a small piece of foil. The piece of foil should just cover the edge, you don't want it to be too large because you won't be able to smooth it.

Pull the foil tightly around the edges of the circle and smooth the edge. Give the circle a press. I press for about 10 seconds on both sides of the foil covered circle.

Wait for the foil to cool completely! It's very hot so be patient! Once it's cooled you can unwrap and give your perfect circle a press!

The Sunflowers block features 4 large sunflowers and 8 large arching leaves. As in the book, I chose to make my petals scrappy by using various Atsuko Matsuyama prints. I found it easier to make petal templates from one flower and prepping those small petals in multiples. You can leave the bottom edge unfinished since the bottom of the petal will be covered by the large center circle.

Again, the stem for the flowers in the Sunflowers block are straight so no need to cut the stem from the bias. I prefer to cut my stem on the straight of grain and simply fold both sides into the center to give a finished edge. Press well and starch. This gives me a straight stem that will not stretch!


For the large center circle, I used the starch method to prepare my applique and the CutRite Heavy Duty Freezer Paper. CutRite Heavy Duty Freezer Paper is a game changer!
In preparation for the applique, I folded my background square on the diagonal both ways. And I marked the placement of the shapes on my background fabric using a Frixion pen. With my background marked, and my pieces prepped, my project is now portable. I don't need to carry around my lightbox.

Begin stitching the stems first. Then stitch the petals and last add the circle on top of the petals. Make sure your circle covers enough of the petal so that there aren't any exposed raw edges.

Take care when stitching the leaves. The very pointy point at the top and bottom of the leaf is thin and requires patience to tuck the excess fabric under. But it's important to have the points as well as the placement of the large leaves as perfect as possible. It's so striking with the swooping leaves!
Lastly, remember to match your thread color to the applique color. And if you are having trouble with your thread getting tangled as you stitch, I have a couple ideas to try. First, make sure your thread length is not too long. I usually use a piece that is equal in length from my hand to about my elbow. Thread can fray as it moves through the fabric and eye of the needle. So to keep from tangling and to preserve the integrity of your thread, cut an appropriate length. Also, thread your needle from the end of the thread that comes off the spool. This will help to keep it from twisting and tangling. An easy way to remember which end comes off the spool is to thread your needle first, pull the thread on the spool to the proper length and then cut! I hope that helps!
Have fun with the blocks this week! And most of all, thank you for sewing along!
#thevintageflowersamplerquiltsal
]]>
We will post a pieced block and an applique block on Instagram and a Blog post each Monday. The blocks will be taken in the order in which they appear in the book. We will walk through the instructions as they are outlined in the book and will add helpful tips!
Be sure to post your progress on Instagram using the hashtag #thevintageflowersamplerquiltsal. We will be randomly choosing giveaway winners from this hashtag.
Also, you may wish to follow the Atsuko Matsuyama Quilting Fan Club on Facebook!
Lastly, please remember to work at your own pace. Summer is a busy time of year for families! You may love applique and decide to do only applique blocks, either making a smaller quilt or doubling up on the applique blocks to have a 24 block quilt. It's your quilt and we want you to be successful and to have fun!
This week we will feature Corn and Beans plus Ping Pong Mums


Corn and Beans

The first tips I would like to offer for the Corn and Beans block, is accurate cutting and accurate/consistent seam allowance. All blocks use a 1/4" seam allowance.
When I cut squares, I make sure to place my acrylic ruler on my fabric so that I have my raw edge not only running along the vertical line on my ruler, but the top edge is running along the horizontal line on my ruler. Then I know everything is square and straight. Of course, press all fabrics before cutting and I know many quilters also starch fabrics before cutting.


Because the Corn and Beans block contains quite a few triangles, I want to caution everyone to be careful when machine stitching and pressing, try not to stretch the bias edge.
When cutting the squares in half on the diagonal, use the markings on your mat to be sure you have cut as accurately as possible. Beginning with pieces cut correctly can help eliminate multiple mistakes in the end.

Once I have all my pieces cut, it helps to lay them out in front of you just as depicted in the book.

As you are piecing the triangles in Corn and Beans, carefully line up straight edges that will be pieced to the next unit. You will notice that the tip of the triangle is hanging off the edge. We call those "dog ears". You will have about a 1/4" dog ear hanging off the edge and when you stitch with your 1/4" seam allowance, the needle should fall right in that "v" where the dog ear meets the straight edge of the HST unit.


Press each unit as you stitch. As a general rule, in quilting, we press the seam to the darker fabric. The arrows in the book indicate the direction to press the seam. However, if I find that a seam wants to fall in a certain direction, I don't fight it. I will simply press in that direction.
Once you have all three sections of the B unit complete, it's time to stitch those sections together. You will notice that you have a 1/4" seam allowance next to the points in the triangles. That's a good thing! It means your pointy points will remain and not end up in the seam.

If you flip the unit over, you should be able to see the intersection where the seams come together. When stitching the units together, to preserve your point, you want to be sure you are stitching just a thread above that intersection.

The sections need to line up properly to create the ladder effect in the Corn and Beans block. With right sides facing, you can fold back the two pieces at the 1/4" seam allowance to see if you have the proper placement. In fact, I place a mark with my Frixion pen to mark the points (on the right side) where they should meet. Then pin in place. Of course, again, you will notice 1/4" dog ears hanging at the beginning and end of the two units. Your needle should enter the seam at the "v" and exit the seam at the "v" created by the dog ear.

To complete the square, you will be adding a large triangle (A) to the sides of the B unit. The background fabric (A) triangle sits on the side with 2 colorful triangles. And the other (A) triangle sits on the side with 3 colorful triangles. Again, refer to the diagram in the book for placement.
To correctly place the large triangle, I press a crease from the tip to the center bottom. Then I line up this crease with the center of the small triangle unit.


Once you have the first square complete, repeat to make three more and then stitch together to create your Corn and Beans block. If necessary, trim to 12.5" square. I like to use a 12.5" square ruler to trim all of my blocks.

Alternatively, you can piece the Corn and Beans block in the following way. First stitch all of your HST bits. And line up the end triangles next to your HST in this manner.

**excuse my mat...I have been using a lot of starch and glue...LOL**
Using a quarter inch seam allowance, sew into three rows.

Then press the seam allowances in opposite directions and stitch the three rows together. Add the large (A) triangles in the same manner as before.

Ping Pong Mums

Not long ago, I had a series of tutorials on our Instagram (Sunny Day Supply) to demonstrate how I have been using the starch method to complete the applique blocks. I will go through my process again here. Please, note that you do not have to use the starch method. Use your favorite method of applique, whether it be needle-turn or machine applique.
To begin, I cut my background square 13.5 inches. These will be trimmed back to 12.5" once the applique is complete. I don't want to lose any of my precious applique when trimming back, so I begin by creasing my background from corner to corner in both directions. Then, using my Frixion pen, I make a line 1/2" in from all four edges to which reflects the 12.5" unfinished block. And then another line 1/4" in from the first line, to reflect the finished block.

Now I grab my light box! If you don't have a light box, a sunny window and some tape will do. I print the Full-Size Template at 100% on my printer.
Then with the copied template on my light box, I place my background fabric on top of the printed template. Aligning the heavy straight line of the template edge with the lines representing my 12" block (the inner most lines), I take my Frixion pen and trace the outline of the applique.
In this blog post, I will briefly describe the method I have been using for applique. I have found for this project; I am getting great results and it has been very enjoyable! For the starch method in applique you will need to gather a few tools.
You will need a starch product. I use Faultless Premium Professional Starch, CutRite Heavy Duty Freezer Paper or Reynolds Freezer Paper, a small angled paint brush or craft brush, paper scissors, fabric scissors, and an iron.
Spray a bit of the starch into the lid or a small container. You want the starch to rest and the foam to dissipate, leaving only liquid starch.

Placing the CutRite Heavy Duty Freezer Paper on top of the printed template and light box. Trace the shapes with an extra fine marker. You will need to isolate any shapes that are touching or on top of one another. **note this is not the Ping Pong Mum block, but the instructions apply**

Then carefully cut out the shapes with your paper scissors. Try to make the shape as smooth as possible. If you feel any jagged edges on the shape, you can use an emery board to smooth out the edges. Note that when you are tracing onto the CutRite paper, you are tracing on the paper side. The shiny or waxy side will be pressed against the wrong side of the fabric. If you are using Reynolds Freezer paper, you will need to layer about three sheets of paper to create the template. The CutRite paper is heavy enough to use as a single sheet.
Press your shape to the wrong side of the fabric using a dry hot iron. I have loved using my mini Oliso! You may want to use the small Clover craft iron or even your large iron will work. Just be sure it is a dry iron without steam.
Using your fabric scissors, cut out around the shape leaving a scant quarter inch seam allowance. If your shape has dips or is a small circle, you may want to clip around the shape close to the template edge. This should help in easing in fullness and keep your shape smooth. I try to clip as little as possible. You may also want to use Fray Check in areas that you have clipped as added insurance against fraying.

Paint the edges of your shape with the liquid starch. I usually start in an easy spot, like the long gentle curve of the apple. As you paint a section of the seam allowance with starch, follow up with a hot iron to gently fold the seam allowance to the back of the shape. If a spot seems less than smooth, you can lift it and reapply a bit of starch and pull it over the edge and press. A stiletto can come in handy to hold an area while you give it a good hot press. Once your shape is perfect and has had time to cool off, simply pop out the template! The CutRite template can be used over and over.


For the Ping Pong Mum, the shapes are very simple. Just circles and leaves. For the leaf shape, I follow the same basic technique except I have found it helps to apply less starch to the tips.


If you are right handed, it may help in executing the applique if you have the flag (tip) at the top facing left and the bottom flag facing right. You will begin stitching on the curve of the right hand side and tucking the flag under and continuing to stitch down the left hand side. Reverse if you are left handed.
When your shapes are all starched and the templates removed, you are ready to start the applique. The first part of the applique to be applied to your background is the shape that would be underneath other shapes. In the Ping Pong Mum, that would be the stems. The book calls for stems to be made with a bias tape maker and fusible web tape. I went a different route with my stems. In the applique blocks, you do not need to use bias for the stems as all of the stems are straight.
I cut my stem fabric to the size indicated in the pattern and then pressed my stem in half lengthwise.

Next, I pressed the the long edges in to meet the center.
Give the stem a little starch and press.
I found for such a small stem, this was easy! Before I baste the stems into place for applique, I mark the center of the stems lengthwise and match to the center of the 13.5" background square. To baste into place, I simply used small dots of glue. Of course, you can also use applique pins or the fusible tape.

Finally, you are ready to applique! Of course, begin with the stems and match your thread color to the applique shape. So for my stems and leaves, I will use green. If you have a shape that is multi colored with no obvious single color, use a neutral thread. I use Richard Hemming Milliners for my applique and my favorite size is size 10.
For your applique, knot your thread and from the back of the block bring your thread up through the very edge of the applique shape. Take the needle and thread down into the background directly under where your needle came through in the edge of the applique shape. Then move forward with your stitch (on the backside) about a 1/4". If you are careful to take your needle and thread back into the background directly under where it exited the edge of the applique, your stitch will be hidden.
On the leaf tips, be sure to nail the point with a stitch and then "tuck" the flag under your leaf with the edge of your needle. You may need to take smaller stitches around the tips of the leaf.


Finally, add the large circles for the Ping Pong Mums. The last shapes to be added will be the center circles and the leaves.
If you search, starch method applique on YouTube, you will find many fabulous videos.
Thank you so much for sewing along! We love this quilt and absolutely love ALL THINGS ATSUKO MATSUYAMA!
#thevintageflowersamplerquiltsal
]]>
You will need a fat quarter for the exterior and a fat quarter for the lining. Fold the fat quarter in half and place the template on the fold of the fabric. Cut two tea cozy shapes from the exterior fat quarter fabric and cut two tea cozy shapes from the lining fat quarter fabric. Be sure to place your template correctly, so that you are able to cut two shapes.


Baste the exterior (front and back) tea cozy shape to batting. Quilt as desired.

If you are using our Tea Cozy Kit, use a pressing cloth and a hot iron, to press the appliques in place. Add the appliques one at a time and place a pressing cloth over the applique and press with a hot iron for a few seconds (until the applique is adhered).


Embellish with embroidered flowers, grass, walkway. And trim the excess batting away from the tea cozy shape.
Take the top loop gingham and fold in half. Top stitch along both edges.


Place the top loop on the front exterior as shown. Baste in place.

With right sides together, stitch a lining tea cozy shape to the bottom edge of the front and back exterior.

Place the front of the tea cozy unit on top of the back tea cozy unit, right sides facing. Stitch all around the tea cozy exterior and lining. Leave an opening in the lining for turning right side out.
Turn the tea cozy right side out and smooth the lining inside the exterior. Hand or machine sew the opening in the lining. Top stitch around the bottom edge of the tea cozy.
Now brew yourself a sweet pot of tea and enjoy your perfectly lovely tea cozy!
]]>

Let's get started. You will need to gather scraps for your 9 Patch - at least 1.5" square. And 1 fat quarter of fabric for the exterior back (perhaps a 1/2 yard if your fabric is directional) and 1/2 yard for the lining. For the background of the front exterior, you will need about a 1/4 yard of fabric.
You will be making (20) 9 Patch blocks. You can make each block unique or repeat colors/fabrics. For each 9 Patch cut 4 - print squares, measuring 1.5" square and 5 background squares, measuring 1.5" square.
The 9 Patch is created by sewing 3 squares in 3 rows. Row one is a background + print + background, Row two is a print + a background + a print, Row three is a background + a print + a background. Press seams toward the dark print. Sew the three rows together to create a 9 Patch. Your 9 Patch should measure 3.5" square.

Your blocks will be arranged as pictured (add more blocks if you are using a larger stocking template or would like more wiggle-room).

Cut sashing strips 1" x 3.5" and add a sashing strip to the bottom of each block that connects to a block below it. Add a sashing strip (1") between the diagonal rows of blocks. See photo. Place your stocking template on top of the completed 9 Patch panel so that the 9 Patch block is on point. It should appear as an X rather than as a cross. Note that I offset the blocks in the diagonal rows. The center of the block in each row will be straddling the sashing in the row next to it.
**If you plan to have your stocking face the other direction, you will need to flip the arrangement of the blocks**
Pin and cut out the stocking front, following the template. Layer a piece of cotton batting under the stocking front and quilt. Repeat for the stocking back (Remember to flip the stocking template when you cut out the back of the stocking). I used a gingham piece of fabric for my stocking back.


For the lining cut out a front and back. You will not need to quilt or layer the lining with batting.
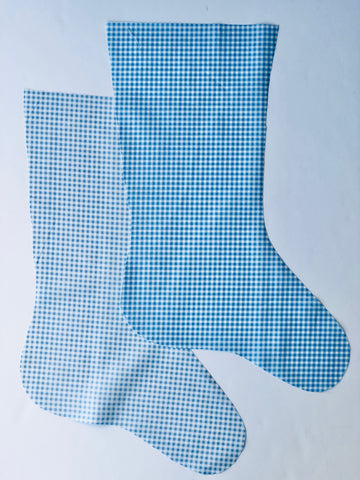
Add a loop for hanging your stocking. Baste the loop to the front of the stocking- raw edges together.

Take the front of your stocking and the corresponding lining piece, stitch along the top edge only. Repeat for the back of the stocking and corresponding lining piece. Be sure that on the front your loop for hanging is sandwiched in between so that only the raw edge is in the seam allowance.

Press the seam allowance toward the lining.
Lay the front stocking and lining unit on top of the back and lining unit, right sides facing. Pin around the stocking and leave an opening of about 3" in the lining for turning right side out.

Using a quarter inch seam allowance, stitch around your stocking. Turn right side out through the opening and press. Hand stitch or machine stitch the opening.
Now stuff your new stocking full of goodies and enjoy!
Be sure to use the #sunnystockingsal when you post your stocking! Thank you for sewing along!

Stockings from Christmas Past!
Templates :
Half Pint Stocking - smaller stocking shape
]]>

Hello! I had so much fun making this bag! I hope you can use these simple instructions to make a bag for yourself. Of course, it would be easy to change the dimensions or the patchwork to make it suit your needs. Let's get started!
Materials:
1 inch hexagon papers
Scraps of fabric for the front exterior hexagons and the back exterior patchwork
Fabric for the sides exterior measuring (2) 4.5 inches wide X 7 inches tall
Fabric for the bottom (1) measuring 4.5 inches X 8.5 inches
Lining fabric for the front and back exterior (2) 8.5 inches wide X 7 inches tall, Sides (2) 4.5 inches wide X 7 inches tall, Bottom (1) 4.5 inches X 8.5 inches
Tabs for the top of the bag, (8) 5 inches wide X 4.5 inches long
Fabric for drawstring, about 50 inches 2.5 inches wide. Or you may use purchased cording, ribbon or linen ribbon tape.
Batting for the exterior
Instructions:
**use a quarter inch seam allowance**
Begin by making 27 - 1 inch hexies. Choose your favorite method for basting. You may want to glue baste or thread baste. If you choose a different size hexagon, adjust the total number accordingly.
Stitch the hexagons together following this placement pattern:: 5 rows - ROW 1 - 5 HEXAGONS, ROW 2 - 6 HEXAGONS, ROW 3- 5 HEXAGONS, ROW 4 - 6 HEXAGONS, ROW 5 - 5 HEXAGONS

Baste the hexagon panel to 100% cotton batting and quilt as desired.

Trim up the quilted hexagon panel so it measures about 8.5 inches wide by 7 inches tall. Set aside.
For the back exterior I made a simple patchwork panel. Sew 4 rows of 1.5 inch squares. 9 squares in each row. I alternated a low volume with a color square to make a checker board pattern.
To the top and bottom, add a border strip cut 2.5 inches X 8.5 inches.
TRIM the back exterior to match the size of the front exterior. BASTE the back exterior to batting and quilt as desired. Set aside.

Cut the side panels, 4.5 inches wide X 7 inches tall. BASTE the side panels to batting and quilt as desired. You may want to add fabric patches to the sides by top stitching a fussy-cut element.


For the bottom of the bag cut a bottom fabric 4.5 inches by 8.5 inches. BASTE to batting and quilt as desired.
Now it's time to add the tabs to all sides of the bag. To make the tabs take your 8 pieces of tab fabric and fold in half along the 4.5" length (folded in half each piece will measure 2.5" wide X 4.5" long). Press. Fold the raw edges on both long sides into the center. Press. Press in half again. Top stitch along the length of both sides of the tab.


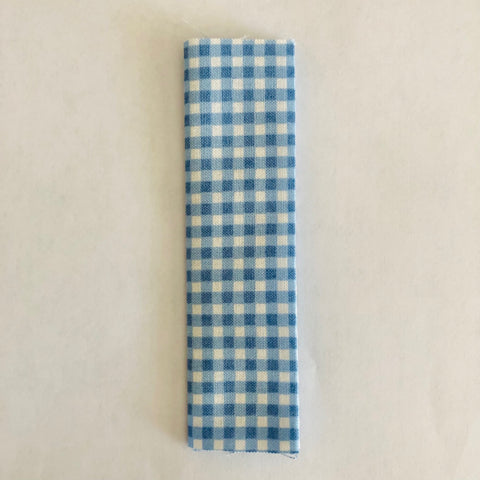
Mark the front and the back exterior in the center - 4.25" in from each side. And mark one inch from each side. Pin a tab in the center of the front and back, lining up the center of the tab with the center mark on the front and back. Pin a tab on the mark one inch from both sides by placing the folded tab inside the mark. The tab should be between the one inch mark and the center.


For each side, place a mark at the top center - 2.25" from the sides. Center the tab over the mark and pin in place.
Stitch baste each tab to the front, back and sides.
Constructing the exterior of the bag:
Sew the bottom panel to both bottom ends of the front and back exterior panels. It is important to begin and end a quarter inch before all 4 corners. In other words, leave a 1/4 inch free and open at each corner. Backstitch at the beginning and end of each seam. By leaving the corners open, it will be easier to box off the bottom and sides of the bag.
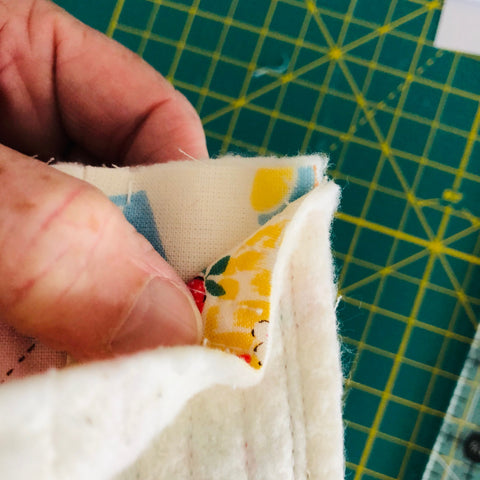
Next add the sides to your front/back and bottom unit. To stitch the sides begin at the top of the bag (backstitch) and end 1/4 inch before the corner at the bottom of the side seam (backstitch).
Once the sides are in place, sew the seam at the bottom to close the opening between the sides and the bottom. This should be much easier to sew since the corners are open. You can easily square off the sides and bottom of the bag.
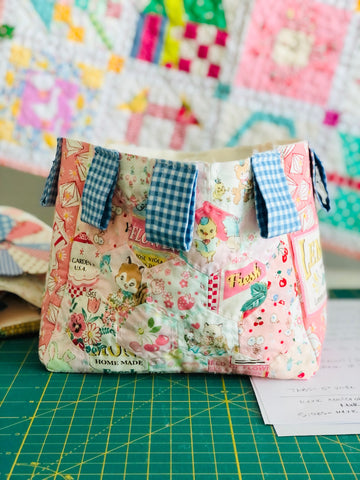
Make the lining. Sew the front and back lining pieces to the bottom. Remember to leave a quarter inch at the bottom of each seam open (just like with the front of the bag).
Sew the sides to the lining, but leave a 3" opening in one side seam for turning right side out. Sew the lining closed at the bottom/side seams.
Turn the exterior of the bag right side out. Place the exterior inside the lining so the right sides are facing. Using a quarter inch seam allowance, stitch the lining and exterior around the top raw edge. Be sure the tabs are sandwiched between the lining and the exterior.
Turn the bag right side out through the opening. Push out the corners and give the bag a good press. Stitch the opening closed.
Top stitch a quarter inch down from the top edge of the bag.
Making the cording. For the drawstring, sew strips of fabric 2.5" wide by 50" long ( you may make the drawstring as long or short as desired). Fold the strip along the length in half and press. Fold the sides into the center and press. Press the length in half along the long edge. Top stitch the open end closed.


Thread the drawstring through the loops with two complete passes. Stitch the two raw ends together. Trim the seam allowance close to the stitching. Make a tab to wrap over the stitched seam. Cute!

Pull up the drawstring so you have 4 loops on one side and 4 on the other! So cute and fun for all your on-the-go stitching or knitting project.

We hope you have fun making your Sunny Rice Bag! Be sure to use the hashtag #sunnyricebag so we can see all your adorable bags!
]]>

Today, I want to share with you a couple of my tips for compeleting your new sewing caddy.
First, if you have a directional fabric, you want to be sure you are cutting the pieces for the front, back and sides correctly. The first measurement in the pattern's cutting instructions is the width(side to side) of your bag piece and the second is the height (top to bottom). Of course, I used my acrylic ruler and rotary to cut out my front/back, pockets, bottom and sides. But for the purpose of this blog post and to illustrate the orientation of the cuts on my directional fabric, I made a paper template of the front and back piece.

You can see, that with a fat quarter, I can easily cut the front and the back pieces side by side on the fat quarter. If you are trying to fussy-cut for the front and back, my suggestion would be to create a template from paper or quilters plastic to use in cutting out your pieces. Remember that the pocket covers part of your front and back sections, so you will want any desireable design element to be above the pockets.
Because the Fruit Label print has so many fun elements, I simply cut a strip from the top of my fat quarter and sub-cut for my front and back pieces.
Again, with the sides and the pockets, make sure that you are careful about any directional fabric.


My second tip is to use a fabric pen or a Frixion Pen to mark points that are important. I used a Frixion Pen (always test first) to mark the line around the outside of the bag for the wire casing.

When I prepared to sew the lining pieces together, I folded the pieces in half and pressed. Then I could match the creases for proper placement of the lining pieces prior to stitching.


And, finally, not really a tip, but an option. I used 40mm macarons to cover and place on the ends of my zipper!

I hope these tips help as you make your sewing caddy! It's a fun pattern and make a very roomy bag for all your sewing supplies!
**PLEASE NOTE - You will find a slip of paper with a Lining Cutting Correction inside your pattern. The lining front/back should be cut (2 pieces) 14.5" X 8" **
Happy Sewing!!!
]]>
The unfinished size of the pinnie template is 4.25" and each "log" is 1/4". You will notice the last 1/4" on each side of the template is the seam allowance (you don't need to add anymore strips after the last four numbered strips on the template). If you want to change the size of the pincushion, just add 1/4" logs beginning at the top and wrapping around counter clockwise.
Materials:
Scraps of 4 different colors. One color per side and various shades of each color.
A small red scrap for the center. Small dark colored scraps for the two sides of the offset center.
4 - 1.5" X 4.25" strips for the sides of the pincushion.
1 - 4.25" X 4.25" square for the bottom of the pincushion.
Filling for the pincushion. I like to use crushed walnut shells, but you can use pieces of batting or polyfil.
Print off the Norah Quilt Pincushion template HERE
Begin by using the Foundation Paper Piece template to make the top of the pinnie. You may use paper specifically designed for FPP or regular printer paper. Remember the last log on each side will include the seam allowance to attach the top to the sides.

Take the 4 strips for the sides (1.5" X 4.25"). Sew the strips together on the short ends. You will be making a loop.


With right sides together, match the first side strip in the loop to a side of the pinnie. It's important to begin stitching a 1/4" forward of the beginning of the side strip and ending 1/4" before the end of the side strip. Back stitch at the beginning and ending of each section. You will stitch each side in the same manner.

the photo above shows the stitching area - repeat for each side
Check to be sure each corner is closed. Your top and side unit will look a bit like a box.
Next take the 4.25" square bottom, and with right sides together, match the sides of the top unit to the bottom and stitch. Remember to beginning stitching a 1/4" forward of the beginning and end 1/4" before the end. Repeat for 3 sides.
On the 4th. side, leave a 2" opening for turning right side out.
Turn the pincushion right side out and gently push out the corners.
Fill the pincushion and hand stitch the opening closed.

Enjoy your Norah Quilt Pincushion!!! Please share it on Instagram with the hashtag #norahquiltpinnie and #norahquiltsal. We can't wait to see your new Norah Quilt Pinnie!!!
]]>
Here is a little recap of the origins of the Norah Quilt and how she got her name. Several years ago, I made a baby quilt for my friend Janelle (you may know her as @NanandNorah on Instagram). She was expecting a little girl, Norah! Fast forward a few years later, I decided to make another and several friends wanted to sew along. The sew along was born and, of course, it had to be called The Norah Quilt!
The Norah Quilt is more a process than a pattern. You can customize your Norah to be any size, any width strip, square or rectangular. The two design elements that make the Norah unique is the off-set center and the color blocking.
I made my Norah with an off-set center. A traditional log cabin begins with a center block and that center is often red, to represent the fire in the home. To off-set the center, I began by adding "logs" to only two sides of the center block. You can choose to two, three or more "logs" to two sides. It's totally up to you!
Once the off-set center is complete, I wrap a neutral color once around the entire unit. Begin at the top of the off-set unit and wrap the neutral strips around counter clockwise. I consider this entire unit the center of the Norah Quilt.
Here is a diagram to illustrate the steps in which to stitch the strips for the center unit. My dear friend, Jenni (@sewlavenderstitches) created this diagram to assist in her Norah sewing. Jenni used 2" wide strips for her Norah. If you use different width strips, your length for the strips will be different. For instance, if you have chosen to cut your strips 3" wide. Your center (#1) will be 3" X 3". The next log (#2) will be 3" x 3".
I've made about 5 Norah Quilts now and I usually choose red or pink for the center. And then I add logs that are darker, often navy or brown. This gives the Norah a very distinct center and adds a bit of drama!
Once you have your 4 colors decided (a color for each of the 4 sides) and your scraps sorted, it's time to begin building a Norah. If you are making a large Norah, my recommendation would be to make all your strips wider. I stitched a larger Norah using 3" strips rather than 2" strips. This allows you to grow the Norah faster and with less trips around the center. The Norah can get a bit puffy in the center with added trips around and around the center in the same direction. I have had a couple quilts which didn't lay completely flat, but I haven't had trouble spray basting them smooth.
My tips for keeping everything smooth and square:
If you are making a large quilt, choose to cut wider strips. Or increase the size of your strips as the quilt becomes larger. Don't cut all your strips at once, in case you decide to start increasing the width after you have started.
Cut your strip to the exact length needed before stitching to each side.
Pin, pin, pin! Once your strip is cut to match the length needed, find the center of the strip and the center of the quilt side and pin. Pin at the ends and, ease in any fullness, and pin between.
Let your machine do the work! Don't stretch or pull as you stitch. The pins will also help avoid stretching.
Square up each corner before adding the next strip.
Starch can help! I like to use Faultless Premium starch.
Cut straight strips and use a consistent 1/4" seam allowance.
You can find more tips by reading through last year's post HERE
Each side of your Norah will have a designated color. Choose a variety of shades for each color to keep it interesting. You might want to plan each side so that you have an ombre effect! Starting at the top of the center unit, cut a strip the length of the center unit. Pin the center to the center of the quilt, pin the ends and in between if needed. Stitch using a quarter inch seam allowance. Square up the corners. Contine measuring, cutting, pinning and stitching and squaring up the corners, in a clockwise manner around the quilt.
It's a pretty simple process! You can see more Norah Quilts by visiting the hashtag #norahquiltsal . So much inspiration! We will be posting more inspiration and tips from guest Norah stitchers in the weeks to come. Look for those on Instagram.
Lastly, be sure to hashtag your Norah posts with #norahquiltsal.
I will be sharing the a fun little Norah Quilt Pinnie this week. It's a simple Foundation Paper Pieced Norah and perfect for those Norah scraps! Stay tuned for the template and instructions!

]]>