
Mary's Sunny Rice Bag

Hello! I had so much fun making this bag! I hope you can use these simple instructions to make a bag for yourself. Of course, it would be easy to change the dimensions or the patchwork to make it suit your needs. Let's get started!
Materials:
1 inch hexagon papers
Scraps of fabric for the front exterior hexagons and the back exterior patchwork
Fabric for the sides exterior measuring (2) 4.5 inches wide X 7 inches tall
Fabric for the bottom (1) measuring 4.5 inches X 8.5 inches
Lining fabric for the front and back exterior (2) 8.5 inches wide X 7 inches tall, Sides (2) 4.5 inches wide X 7 inches tall, Bottom (1) 4.5 inches X 8.5 inches
Tabs for the top of the bag, (8) 5 inches wide X 4.5 inches long
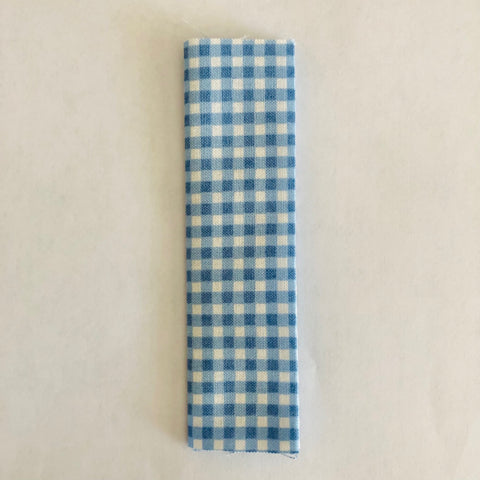
Fabric for drawstring, about 50 inches 2.5 inches wide. Or you may use purchased cording, ribbon or linen ribbon tape.
Batting for the exterior
Instructions:
**use a quarter inch seam allowance**
Begin by making 27 - 1 inch hexies. Choose your favorite method for basting. You may want to glue baste or thread baste. If you choose a different size hexagon, adjust the total number accordingly.
Stitch the hexagons together following this placement pattern:: 5 rows - ROW 1 - 5 HEXAGONS, ROW 2 - 6 HEXAGONS, ROW 3- 5 HEXAGONS, ROW 4 - 6 HEXAGONS, ROW 5 - 5 HEXAGONS

Baste the hexagon panel to 100% cotton batting and quilt as desired.

Trim up the quilted hexagon panel so it measures about 8.5 inches wide by 7 inches tall. Set aside.
For the back exterior I made a simple patchwork panel. Sew 4 rows of 1.5 inch squares. 9 squares in each row. I alternated a low volume with a color square to make a checker board pattern.
To the top and bottom, add a border strip cut 2.5 inches X 8.5 inches.
TRIM the back exterior to match the size of the front exterior. BASTE the back exterior to batting and quilt as desired. Set aside.

Cut the side panels, 4.5 inches wide X 7 inches tall. BASTE the side panels to batting and quilt as desired. You may want to add fabric patches to the sides by top stitching a fussy-cut element.


For the bottom of the bag cut a bottom fabric 4.5 inches by 8.5 inches. BASTE to batting and quilt as desired.
Now it's time to add the tabs to all sides of the bag. To make the tabs take your 8 pieces of tab fabric and fold in half along the 4.5" length (folded in half each piece will measure 2.5" wide X 4.5" long). Press. Fold the raw edges on both long sides into the center. Press. Press in half again. Top stitch along the length of both sides of the tab.


Mark the front and the back exterior in the center - 4.25" in from each side. And mark one inch from each side. Pin a tab in the center of the front and back, lining up the center of the tab with the center mark on the front and back. Pin a tab on the mark one inch from both sides by placing the folded tab inside the mark. The tab should be between the one inch mark and the center.


For each side, place a mark at the top center - 2.25" from the sides. Center the tab over the mark and pin in place.
Stitch baste each tab to the front, back and sides.
Constructing the exterior of the bag:
Sew the bottom panel to both bottom ends of the front and back exterior panels. It is important to begin and end a quarter inch before all 4 corners. In other words, leave a 1/4 inch free and open at each corner. Backstitch at the beginning and end of each seam. By leaving the corners open, it will be easier to box off the bottom and sides of the bag.
Next add the sides to your front/back and bottom unit. To stitch the sides begin at the top of the bag (backstitch) and end 1/4 inch before the corner at the bottom of the side seam (backstitch).
Once the sides are in place, sew the seam at the bottom to close the opening between the sides and the bottom. This should be much easier to sew since the corners are open. You can easily square off the sides and bottom of the bag.
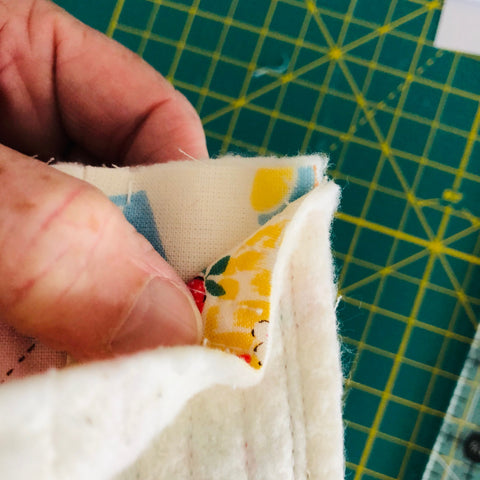
Make the lining. Sew the front and back lining pieces to the bottom. Remember to leave a quarter inch at the bottom of each seam open (just like with the front of the bag).
Sew the sides to the lining, but leave a 3" opening in one side seam for turning right side out. Sew the lining closed at the bottom/side seams.
Turn the exterior of the bag right side out. Place the exterior inside the lining so the right sides are facing. Using a quarter inch seam allowance, stitch the lining and exterior around the top raw edge. Be sure the tabs are sandwiched between the lining and the exterior.
Turn the bag right side out through the opening. Push out the corners and give the bag a good press. Stitch the opening closed.
Top stitch a quarter inch down from the top edge of the bag.
Making the cording. For the drawstring, sew strips of fabric 2.5" wide by 50" long ( you may make the drawstring as long or short as desired). Fold the strip along the length in half and press. Fold the sides into the center and press. Press the length in half along the long edge. Top stitch the open end closed.


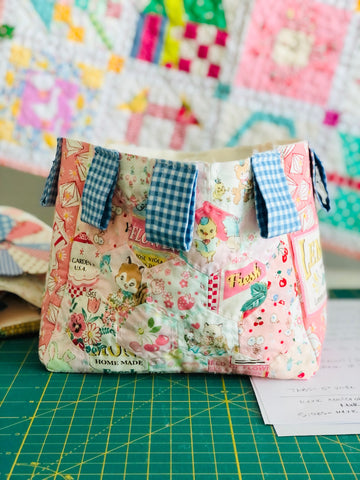
Thread the drawstring through the loops with two complete passes. Stitch the two raw ends together. Trim the seam allowance close to the stitching. Make a tab to wrap over the stitched seam. Cute!

Pull up the drawstring so you have 4 loops on one side and 4 on the other! So cute and fun for all your on-the-go stitching or knitting project.

We hope you have fun making your Sunny Rice Bag! Be sure to use the hashtag #sunnyricebag so we can see all your adorable bags!