
Sunny Stocking Sew Along 2020!
Well, it's that time of year again! Time to dust off your jingle bells and start stitching a whole new batch of stockings!

This year the Sew Along will begin October 5, 2020 and run for at least a month. We would like to keep the closing date open ended, because it's 2020 and we all need a relaxed schedule this year.
So let's begin! In this blog post, I will walk you through two stocking designs: the diamond stocking and the clamshell stocking. You are welcome to look back through past Stocking Sew Along blog posts. I have updated the piecing in this post. Hopefully, you will find piecing the diamonds a bit easier.
Here is the template for the stocking :STOCKING TEMPLATE . You will need to print it off and tape the sections together.
For the diamond stocking you will need to download the diamond to make your template. DIAMOND
Print off the diamond and using quilters template plastic, freezer paper, or cardboard, prepare a diamond template. I like using quilters template plastic so I can see through the template for fussy cutting.

Once you have your template, you will need to cut enough diamonds to make a panel large enough to accomodate your stocking shape. For my stocking, I cut 42 diamonds. If you are making a smaller or larger stocking you will need to adjust the number of diamonds. My panel has 6 rows with 7 diamonds in each row. If you want more wiggle room in cutting out the stocking, make the panel larger.
You can add a bit of tape or sand paper to the back side of your plastic template to keep it from slipping. There are a couple of methods for cutting out the diamonds. You may want to use a fine pencil or Frixion pen to trace around the template and cut with scissors. Or you may choose to place your acrylic ruler along the edge of your template and cut with a rotary. If you choose to cut along the template with a rotary, take care to not trim the template.


I would recommend laying out your diamonds in rows to check balance of prints and color before sewing them together. Once you are happy with the placement, begin by placing the first two diamonds of row one right sides together. The points will be offset by a scant quarter inch. You will know the position is correct if your needle begins and ends in the "V" of the two diamonds.


Continue adding diamonds until the first row is complete.
Repeat for the second row of the diamond panel.
Here is the tricky part! Your rows will be sewn together, but the first diamond in the row will not be completely pieced. Rather the top of your panel will look like a series of mountains and valleys.

Using a 1/4 inch seam allowance stitch two strips together making sure you have the angled seams meet at the 1/4 inch seam allowance. I found that if I make sure the diamond seam, on the strip facing me, met with the dog ear on the strip underneath, this would result in a correct placement. Just be patient, it is a bit fiddly!


Using a quarter inch seam allowance stitch row 2 to row 1. If you find that your diamonds did not line up properly, simply unpick a few stitches on both sides of the seam and wiggle the diamonds into place and resew. Take care not to stretch your fabric as you sew.
If you want to make sure those diamonds line up perfectly, try this trick! With a Frixion Pen mark the quarter inch seam allowance on the RIGHT sides of diamond row 1 and diamond row 2.

Take diamond row 2 and fold back the seam on the marked line and press in a crease. The mark from the Frixion Pen will disappear when heat is applied. Position diamond row 2 on top of diamond row 1, matching the diamonds. Pin or glue baste in place, with right sides together and stitch.

Note: you will stitch row 1 and row 2 together in the same manner as any other patchwork. Right sides facing and using a quarter inch seam allowance.
Repeat with the remainder of the rows of diamonds.
When your diamond panel is finished, place your stocking template on top of the panel. You will need to make sure your diamonds are situated so the diamonds are running up and down not on an angle.
I tape my panel to a window so I can clearly see the orientation of the diamonds under the stocking template.
Trace your stocking shape onto the right side of the panel with a Frixion Pen or your favorite marking tool. Remove the stocking template and make certain the diamonds are vertical.

Take a deep breath and cut out the stocking shape! Spray baste, pin baste or thread baste the stocking front to low loft cotton batting and quilt as desired.
Cut the back of your stocking from a coordinating fabric. BE SURE to FLIP the stocking template before cutting out the back side of the stocking. Otherwise you will have two front facing stockings (ask me how I know....haha!!). Quilt back side of the stocking as desired.
Cut two linings using the stocking template....be sure you have a front and a back.
If you want to add a permanent ribbon hanger, now is the time. Place your ribbon where you would like it, keeping in mind the side seam allowance and baste in place.

Place the linings with the front and back side of the stocking, right sides facing, and using a 1/4 inch seam allowance, stitch along the top of the stocking only.

Place the front unit and back unit on top of each other, with right sides facing, The linings should be on top of each other, right sides facing. And the stocking front and back should be on top of each other, right sides facing.

Mark an opening on the foot of the lining. You will use this opening to turn the stocking right side out.
Turn the stocking right side out and push out all the curves and corners. Smooth the lining and sew up the opening.
Give your stocking a press and it's finished! This is the same basic method we will use for all stocking assembly. Of course, if you have another method that works best for you, please use that method!
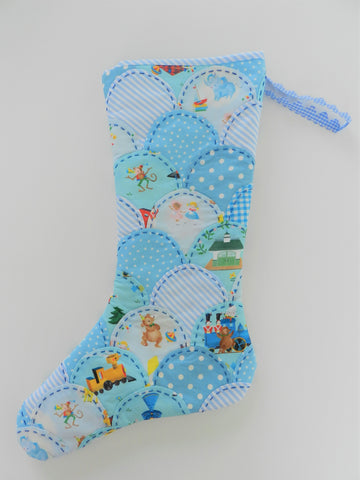
Now let's look at the Clamshell Stocking!
First you will need to download the clamshell template: CLAMSHELL TEMPLATE

Using your clamshell template and a Frixion pen, trace clamshells onto the right side of your fabric. This is perfect for using fabric that can be fussy-cut.
When you cut the clamshells be sure you cut about an 1/8 inch beyond the marked line - DO NOT CUT ON THE MARKED LINE OF THE CLAMSHELLS!
Glue baste the first row of clamshells on the foundation fabric. The grid lines will help keep your clamshells straight.
 Using needle-turn applique', sew the clamshells to the foundation fabric. Once the first row is complete, glue baste the second row so that the clamshells are filling in the space between the row above.
Continue until the panel is full of lovely clamshells! Cut the stocking shape from your panel and quilt as desired! **Note** you will NOT need batting added before quilting. With the foundation fabric and the clamshells, the panel is thick enough to be hand quilted.
Once quilting is complete, use the method above to complete your clamshell stocking!
If you would like to read more about my method of stitching with clamshells you can read about clamshells here: Mary's Clamshells
I think that is enough information to get you going!
Merry Making!!!
Be sure to hashtag your stockings and stocking progress with #sunnystockingsal
**Stocking templates and instructions are the intellectual property of Sunny Day. All stocking templates and instructions are intended for personal use and gift giving**