
The Vintage Flower Sampler Quilt - Cat's Cradle + Sunflowers
It's Monday! Time for another #thevintageflowersamplersal installment!


Today we will be working on the pieced, Cat's Cradle block and the applique, Sunflowers block.

Cat's Cradle
Let's begin with the Cat's Cradle block! Again, this week we are working with triangles. It's important to try to be as accurate as possible in cutting. And to be consistent in your seam allowance. To help with your seam allowance, there are many tools available to ensure your seam allowance is accurate. If you don't have a quarter inch foot, try adding a strip of masking tape or washi tape so the edge meets the quarter inch mark on your stitch plate. Then simply stitch making sure your raw edge meets the tape marked line.
Also, several quilters have mentioned that they prefer to starch their fabric prior to cutting. If you are finding that your cutting is not quite accurate, you may want to try starching first. The starch helps to keep your fabric from stretching.
Once you have your triangles and squares cut, it's time to start stitching. First, make the 6 HST (half square triangles). The 6 HST's will consist of a colorful fabric plus a low volume background fabric. It always helps me to lay out everything in correct order on my mat in front of me. That way I am less likely to stitch incorrectly and need the seam ripper.

Take 2 more colorful triangles, with right sides facing, line up the straight (90 degree) edges and stitch using a quarter inch seam allowance. Remember that the dog ear, of the colorful triangle, will extend beyond the HST unit. Your needle will fall in the "V" created at that intersection.

Add a large triangle (C) to the long straight edge of your pieced unit. As in the previous blog post, I finger press a crease in the center from the point to the center of the long edge. Match the center of the large triangle to the center of the pieced unit. Stitch and press seam allowances following the diagram in the book.

Now it's time to sew your squares into rows! Arrange your squares on your mat and refer to the diagram in the book for correct orientation. Be careful! It's easy to get those squares flipped around!

You should have three rows. Press seam allowances in opposite directions in the three rows. This will allow you to butt up your seam allowances, so all your squares meet perfectly. Pin at the seams and the ends of the row. Stitch.

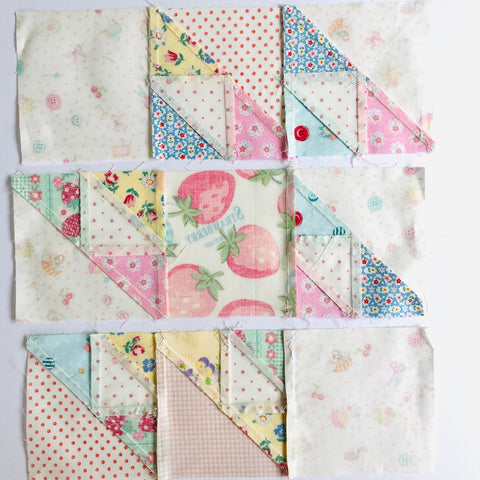
Press your Cat's Cradle block and give yourself a pat on the back for conquering the triangles!
Sunflowers

Okay, we are ready to tackle another applique block! The large leaf in this block might be a bit tricky, but this is one of my favorites from the book! I hope you like it too! In my previous blog post, I described the starch method that I am using for the applique blocks in the book. No matter your favorite technique for applique, the blocks in this quilt are fairly quick stitching!
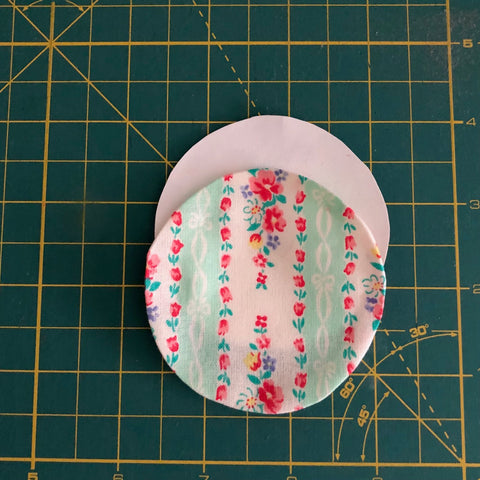
A common shape in this quilt is the circle. On our Sunny Day Instragram account we have had a couple of discussions regarding circle applique techniques. There are many ways to make perfect circles! Needle-turn, Kay Buckley's Perfect Circles, the starch method using freezer paper or CutRite Heavy Duty Freezer Paper, or Allipops! My suggestion would be to take a look at our Instagram posts, June 18th. and June13th. for the informative discussion. Also, a quick YouTube search will yield many excellent videos! Here is a brief overview of a fun way to use the Perfect Circle templates without having to use a running stitch. You will need spray starch. A small piece of cheap foil, not the heavy duty foil. Your Perfect Circle templates and an iron. Choose the size circle you need and, using your Frixion pen, trace around the circle on the wrong side of your fabric.

Spritz your fabric with a shot of starch. Then place your fabric circle plus the template in a small piece of foil. The piece of foil should just cover the edge, you don't want it to be too large because you won't be able to smooth it.

Pull the foil tightly around the edges of the circle and smooth the edge. Give the circle a press. I press for about 10 seconds on both sides of the foil covered circle.

Wait for the foil to cool completely! It's very hot so be patient! Once it's cooled you can unwrap and give your perfect circle a press!

The Sunflowers block features 4 large sunflowers and 8 large arching leaves. As in the book, I chose to make my petals scrappy by using various Atsuko Matsuyama prints. I found it easier to make petal templates from one flower and prepping those small petals in multiples. You can leave the bottom edge unfinished since the bottom of the petal will be covered by the large center circle.

Again, the stem for the flowers in the Sunflowers block are straight so no need to cut the stem from the bias. I prefer to cut my stem on the straight of grain and simply fold both sides into the center to give a finished edge. Press well and starch. This gives me a straight stem that will not stretch!


For the large center circle, I used the starch method to prepare my applique and the CutRite Heavy Duty Freezer Paper. CutRite Heavy Duty Freezer Paper is a game changer!
In preparation for the applique, I folded my background square on the diagonal both ways. And I marked the placement of the shapes on my background fabric using a Frixion pen. With my background marked, and my pieces prepped, my project is now portable. I don't need to carry around my lightbox.

Begin stitching the stems first. Then stitch the petals and last add the circle on top of the petals. Make sure your circle covers enough of the petal so that there aren't any exposed raw edges.

Take care when stitching the leaves. The very pointy point at the top and bottom of the leaf is thin and requires patience to tuck the excess fabric under. But it's important to have the points as well as the placement of the large leaves as perfect as possible. It's so striking with the swooping leaves!
Lastly, remember to match your thread color to the applique color. And if you are having trouble with your thread getting tangled as you stitch, I have a couple ideas to try. First, make sure your thread length is not too long. I usually use a piece that is equal in length from my hand to about my elbow. Thread can fray as it moves through the fabric and eye of the needle. So to keep from tangling and to preserve the integrity of your thread, cut an appropriate length. Also, thread your needle from the end of the thread that comes off the spool. This will help to keep it from twisting and tangling. An easy way to remember which end comes off the spool is to thread your needle first, pull the thread on the spool to the proper length and then cut! I hope that helps!
Have fun with the blocks this week! And most of all, thank you for sewing along!
#thevintageflowersamplerquiltsal