
The Vintage Flower Sampler Quilt - Lattice Fan and Strawberries
Wowza! It's week 11!!! One more week to go! But if you are still stitching, please continue to post your blocks and use the hashtag. We will have "Meet Up" dates to chat about finishing the quilt. Look for a blog post on those dates to come.
This week we leave the Y-seams behind and say hello to the curves! Perhaps that's out of the frying pan and into the fire!
Our patchwork block is Lattice Fan and our applique block is Strawberries.


Lattice Fan -

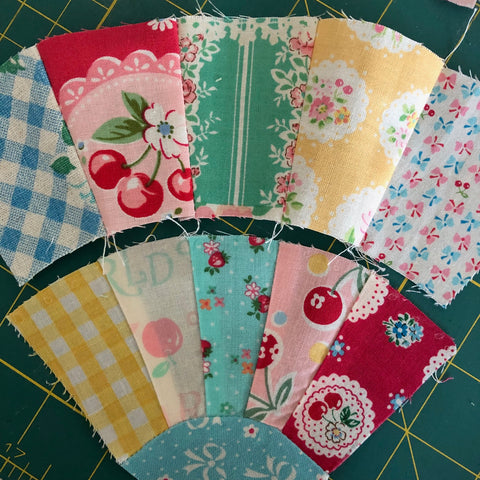
Lots of curves in this block! And to make it even more exciting we have double curves with seams that need to match. First of all, I made my templates this week with CutRite Heavy Duty Freezer Paper. Since I am repeating shapes multipe times, I felt the CutRite Freezer Paper would hold up a bit better.
Once you have your shapes all cut, make sure you are stitching together using a scant quarter inch seam allowance. On my machine that is a 3.7 needle setting. You can check your seam allowance to make sure it is a scant quarter inch. If you haven't done that before simply cut two squares - you may want to cut two 2.5" square. Stitch together with right sides facing and press. Your squares sewn together should measure 4.5". If they are larger or smaller adjust your needle setting or your seam guide until you have two pieces measuring 4.5". You might want to mark your seam allowance on your machine with masking tape or washi tape.
In the Lattice Fan block the first curve to sew is the tiny A template to the B arc. Finger press both pieces so that you can match the middle. Then once you have the middle matched, match the ends. You might want to glue baste this very small quarter circle to the B arc.

Once you have the A piece and B arc basted by pins or by glue, it's time to stitch. With curved pieces you always want to stitch with the concave piece facing you. In other words, the piece that looks like a smile or a 'C'.
Stitch slowly, making sure you keep the raw edges together. Press the seam allowance toward the A piece.
Now it's time to add the second arc or the C pieces. It's very important to match the seams from the B arc to the C arc. Pin at each seam. And pin at the center and the ends.
Again, sew with the concave piece facing you. Press the seam toward the C arc.
If you find any seams are not quite matching, just remove a few stitches on both sides of the seam and adjust. Re-sew the seam at that spot.
Add the large background piece D to each of the fan units. This is done in the same way. Find the center of the larger outer background piece and the center of the pieced fan unit. Pin at the center and the ends. You may pin in between those 3 spots if you wish. Sew again, with the concave piece facing you. Press the seam toward the fan unit.
Sew all 4 fan + background units together following the diagram in the book. Give it a good press and trim to 12.5" if necessary.
Strawberries -

The Strawberries Block is a delightful and fun applique. For all of you who have followed Atsuko Matsuyama over the years, you know the strawberry motif is central to most of her designs.
I used the CutRite Heavy Duty Freezer Paper for my templates. I printed my templates using my home printer. Then I used the starch method to create my applique pieces.
Once the applque is complete, add embroidery stitches using Moco thread or your favorite floss.
Give your Strawberries block a press and trim to 12.5".