
The Vintage Flower Sampler Quilt - Lost Children and Oranges
It's week 8!!! We are more than halfway through the quilt! If you have previous week's blocks to complete, worry not. We have another "catch up" week the week of August 14th.
This week we have the patchwork block, Lost Children... and the applique block,Oranges.


Lost Children -

This is the first time in this quilt that we have dealt with the dreaded Y-seams! But luckily this Y-seam is wide and gentle. So let's get started!
I used the template to create my small triangle shapes. And placed all the shapes out in front of me before deciding on a pleasing arrangement. Before sewing my shapes together, I did starch them to control the stretch of the bias. I used a scant quarter inch to stitch all four of the small triangle units.
Create the center piece by stitching two small triangle units to the center square. **NOTE- Because we will be adding a triangle unit to the center piece, we need to leave a quarter inch free at the beginning and end of this center piece. Using your acrylic ruler, mark a quarter inch from each of the 4 corners on the center square ** In the book instructions, you will notice small dots on all four corners of the center square. This is the point where the seam will start and stop. DO NOT SEW BEYOND THE DOTS. Press the seams in the center unit toward the center square.

Stitch two large triangles to both sides of a small triangle unit. **NOTE - Mark the wrong side of the wide end of small triangle unit with a dot. This dot will be one quarter inch from the top of the wide end of this unit. You will leave the the first quarter inch of this unit free. The seam allowance will begin at the dots (as represented in the book).** DO NOT SEW BEYOND THE DOT!

I always place the more "difficult" piece facing me as I stitched this block. In this case, it would be the small triangle units. That way I can be sure my points are preserved by hitting the spot where the seams meet to create the point. Also remember to back stitch a few stitches when you reach the dot.
Before stitching, I lighty starched each of my large triangle units.
I made a series of short videos to illustrate the Y-seam in this block. You can find the videos on Instagram.
I found it easier to stitch the center square to the center of the "wing" unit first. The wing unit is the small triangle with two large triangles. Be sure to start and end at the dot. In other words, the beginning quarter inch and ending quarter inch should be free of stitching (when added to the center unit).
Then I matched the engineered corners of the large triangle to the center unit. With the small triangle unit facing me, I stitched a scant quarter inch seam allowance. Making certain I never stitched beyond the dot.
All of the seam allowances will converge at the dots. That is what makes it a Y-seam. Please, be sure to check the videos on Instagram if you have any questions about sewing this block. I am hopeful the videos will help!
Oranges -
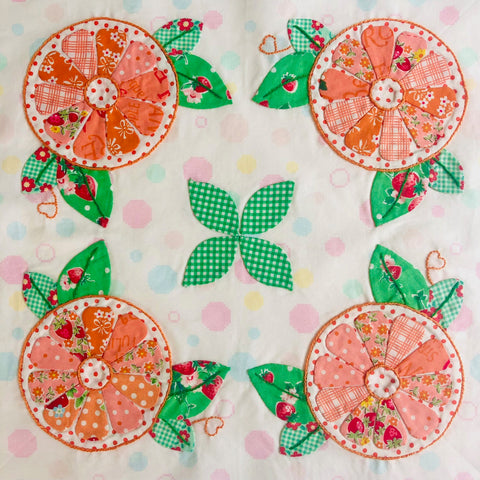
For the oranges blocks I used the starch method of applique, but use any method with which you feel most comfortable.
I used my home printer to print the templates on to the CutRite Heavy Duty Freezer paper. And after preparing all the individual pieces, I created each orange as a single applique.

Using basting glue and my lightbox, each segment was secured to the orange circle. Applique each segment to the circle with a matching thread.
I arranged the leaves and appliqued each leaf in place on the background.

Once everything is arranged and appliqued to the background, you will add embroidery stitches (stem stitch) to outline the center and outer orange circles. I used a back stitch to create the heart next to the orange leaf.
This block takes some time with all the parts, but it's so worth all the effort! We can't wait for all the oranges to pop up on the hashtag #thevintageflowersamplerquiltsal !!! Thank you for sewing along with us!