The Vintage Flower Sampler Quilt Sew Along - Corn and Beans + Ping Pong Mums
The day has finally arrived! Today we begin The Vintage Flower Sampler Quilt Sew Along. I was very fortunate to be a tester for the blocks in the book last Fall! It has been a huge pleasure to work on a quilt designed by our favorite designer, Atsuko Matsuyama. I hope you love these blocks as much as we do!
We will post a pieced block and an applique block on Instagram and a Blog post each Monday. The blocks will be taken in the order in which they appear in the book. We will walk through the instructions as they are outlined in the book and will add helpful tips!
Be sure to post your progress on Instagram using the hashtag #thevintageflowersamplerquiltsal. We will be randomly choosing giveaway winners from this hashtag.
Also, you may wish to follow the Atsuko Matsuyama Quilting Fan Club on Facebook!
Lastly, please remember to work at your own pace. Summer is a busy time of year for families! You may love applique and decide to do only applique blocks, either making a smaller quilt or doubling up on the applique blocks to have a 24 block quilt. It's your quilt and we want you to be successful and to have fun!
This week we will feature Corn and Beans plus Ping Pong Mums


Corn and Beans

The first tips I would like to offer for the Corn and Beans block, is accurate cutting and accurate/consistent seam allowance. All blocks use a 1/4" seam allowance.
When I cut squares, I make sure to place my acrylic ruler on my fabric so that I have my raw edge not only running along the vertical line on my ruler, but the top edge is running along the horizontal line on my ruler. Then I know everything is square and straight. Of course, press all fabrics before cutting and I know many quilters also starch fabrics before cutting.


Because the Corn and Beans block contains quite a few triangles, I want to caution everyone to be careful when machine stitching and pressing, try not to stretch the bias edge.
When cutting the squares in half on the diagonal, use the markings on your mat to be sure you have cut as accurately as possible. Beginning with pieces cut correctly can help eliminate multiple mistakes in the end.

Once I have all my pieces cut, it helps to lay them out in front of you just as depicted in the book.

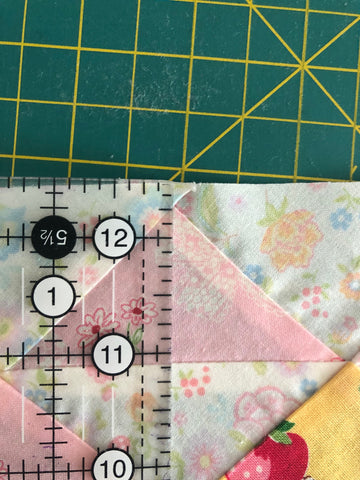
As you are piecing the triangles in Corn and Beans, carefully line up straight edges that will be pieced to the next unit. You will notice that the tip of the triangle is hanging off the edge. We call those "dog ears". You will have about a 1/4" dog ear hanging off the edge and when you stitch with your 1/4" seam allowance, the needle should fall right in that "v" where the dog ear meets the straight edge of the HST unit.


Press each unit as you stitch. As a general rule, in quilting, we press the seam to the darker fabric. The arrows in the book indicate the direction to press the seam. However, if I find that a seam wants to fall in a certain direction, I don't fight it. I will simply press in that direction.
Once you have all three sections of the B unit complete, it's time to stitch those sections together. You will notice that you have a 1/4" seam allowance next to the points in the triangles. That's a good thing! It means your pointy points will remain and not end up in the seam.


If you flip the unit over, you should be able to see the intersection where the seams come together. When stitching the units together, to preserve your point, you want to be sure you are stitching just a thread above that intersection.

The sections need to line up properly to create the ladder effect in the Corn and Beans block. With right sides facing, you can fold back the two pieces at the 1/4" seam allowance to see if you have the proper placement. In fact, I place a mark with my Frixion pen to mark the points (on the right side) where they should meet. Then pin in place. Of course, again, you will notice 1/4" dog ears hanging at the beginning and end of the two units. Your needle should enter the seam at the "v" and exit the seam at the "v" created by the dog ear.

To complete the square, you will be adding a large triangle (A) to the sides of the B unit. The background fabric (A) triangle sits on the side with 2 colorful triangles. And the other (A) triangle sits on the side with 3 colorful triangles. Again, refer to the diagram in the book for placement.
To correctly place the large triangle, I press a crease from the tip to the center bottom. Then I line up this crease with the center of the small triangle unit.


Once you have the first square complete, repeat to make three more and then stitch together to create your Corn and Beans block. If necessary, trim to 12.5" square. I like to use a 12.5" square ruler to trim all of my blocks.

Alternatively, you can piece the Corn and Beans block in the following way. First stitch all of your HST bits. And line up the end triangles next to your HST in this manner.

**excuse my mat...I have been using a lot of starch and glue...LOL**
Using a quarter inch seam allowance, sew into three rows.

Then press the seam allowances in opposite directions and stitch the three rows together. Add the large (A) triangles in the same manner as before.

Ping Pong Mums

Not long ago, I had a series of tutorials on our Instagram (Sunny Day Supply) to demonstrate how I have been using the starch method to complete the applique blocks. I will go through my process again here. Please, note that you do not have to use the starch method. Use your favorite method of applique, whether it be needle-turn or machine applique.
To begin, I cut my background square 13.5 inches. These will be trimmed back to 12.5" once the applique is complete. I don't want to lose any of my precious applique when trimming back, so I begin by creasing my background from corner to corner in both directions. Then, using my Frixion pen, I make a line 1/2" in from all four edges to which reflects the 12.5" unfinished block. And then another line 1/4" in from the first line, to reflect the finished block.


Now I grab my light box! If you don't have a light box, a sunny window and some tape will do. I print the Full-Size Template at 100% on my printer.
Then with the copied template on my light box, I place my background fabric on top of the printed template. Aligning the heavy straight line of the template edge with the lines representing my 12" block (the inner most lines), I take my Frixion pen and trace the outline of the applique.
In this blog post, I will briefly describe the method I have been using for applique. I have found for this project; I am getting great results and it has been very enjoyable! For the starch method in applique you will need to gather a few tools.
You will need a starch product. I use Faultless Premium Professional Starch, CutRite Heavy Duty Freezer Paper or Reynolds Freezer Paper, a small angled paint brush or craft brush, paper scissors, fabric scissors, and an iron.
Spray a bit of the starch into the lid or a small container. You want the starch to rest and the foam to dissipate, leaving only liquid starch.

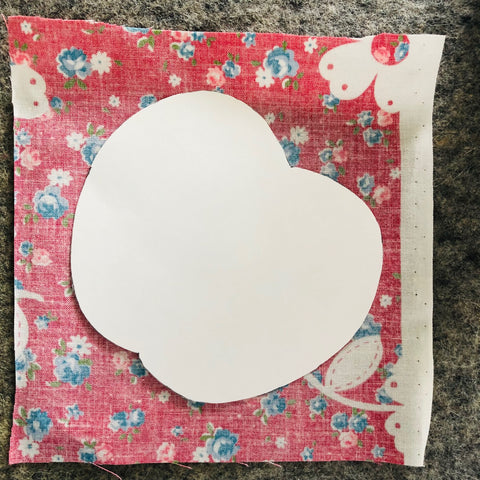
Placing the CutRite Heavy Duty Freezer Paper on top of the printed template and light box. Trace the shapes with an extra fine marker. You will need to isolate any shapes that are touching or on top of one another. **note this is not the Ping Pong Mum block, but the instructions apply**

Then carefully cut out the shapes with your paper scissors. Try to make the shape as smooth as possible. If you feel any jagged edges on the shape, you can use an emery board to smooth out the edges. Note that when you are tracing onto the CutRite paper, you are tracing on the paper side. The shiny or waxy side will be pressed against the wrong side of the fabric. If you are using Reynolds Freezer paper, you will need to layer about three sheets of paper to create the template. The CutRite paper is heavy enough to use as a single sheet.
Press your shape to the wrong side of the fabric using a dry hot iron. I have loved using my mini Oliso! You may want to use the small Clover craft iron or even your large iron will work. Just be sure it is a dry iron without steam.

Using your fabric scissors, cut out around the shape leaving a scant quarter inch seam allowance. If your shape has dips or is a small circle, you may want to clip around the shape close to the template edge. This should help in easing in fullness and keep your shape smooth. I try to clip as little as possible. You may also want to use Fray Check in areas that you have clipped as added insurance against fraying.

Paint the edges of your shape with the liquid starch. I usually start in an easy spot, like the long gentle curve of the apple. As you paint a section of the seam allowance with starch, follow up with a hot iron to gently fold the seam allowance to the back of the shape. If a spot seems less than smooth, you can lift it and reapply a bit of starch and pull it over the edge and press. A stiletto can come in handy to hold an area while you give it a good hot press. Once your shape is perfect and has had time to cool off, simply pop out the template! The CutRite template can be used over and over.


For the Ping Pong Mum, the shapes are very simple. Just circles and leaves. For the leaf shape, I follow the same basic technique except I have found it helps to apply less starch to the tips.


If you are right handed, it may help in executing the applique if you have the flag (tip) at the top facing left and the bottom flag facing right. You will begin stitching on the curve of the right hand side and tucking the flag under and continuing to stitch down the left hand side. Reverse if you are left handed.
When your shapes are all starched and the templates removed, you are ready to start the applique. The first part of the applique to be applied to your background is the shape that would be underneath other shapes. In the Ping Pong Mum, that would be the stems. The book calls for stems to be made with a bias tape maker and fusible web tape. I went a different route with my stems. In the applique blocks, you do not need to use bias for the stems as all of the stems are straight.
I cut my stem fabric to the size indicated in the pattern and then pressed my stem in half lengthwise.

Next, I pressed the the long edges in to meet the center.

Give the stem a little starch and press.

I found for such a small stem, this was easy! Before I baste the stems into place for applique, I mark the center of the stems lengthwise and match to the center of the 13.5" background square. To baste into place, I simply used small dots of glue. Of course, you can also use applique pins or the fusible tape.

Finally, you are ready to applique! Of course, begin with the stems and match your thread color to the applique shape. So for my stems and leaves, I will use green. If you have a shape that is multi colored with no obvious single color, use a neutral thread. I use Richard Hemming Milliners for my applique and my favorite size is size 10.
For your applique, knot your thread and from the back of the block bring your thread up through the very edge of the applique shape. Take the needle and thread down into the background directly under where your needle came through in the edge of the applique shape. Then move forward with your stitch (on the backside) about a 1/4". If you are careful to take your needle and thread back into the background directly under where it exited the edge of the applique, your stitch will be hidden.
On the leaf tips, be sure to nail the point with a stitch and then "tuck" the flag under your leaf with the edge of your needle. You may need to take smaller stitches around the tips of the leaf.


Finally, add the large circles for the Ping Pong Mums. The last shapes to be added will be the center circles and the leaves.
If you search, starch method applique on YouTube, you will find many fabulous videos.
Thank you so much for sewing along! We love this quilt and absolutely love ALL THINGS ATSUKO MATSUYAMA!
#thevintageflowersamplerquiltsal
